3 posts tagged with "benchmark"

View All Tags

The TPC-DS benchmark is widely used for measuring the performance of decision support and analytical systems. Databend is a data warehouse that supports TPC-DS SQLs. In this blog, we will walk you through the process of benchmarking TPC-DS with Databend, covering key aspects such as generating TPC-DS data, preparing create tables for Databend, and executing benchmark queries.

What's TPC-DS?

TPC-DS is a decision support benchmark that models several generally applicable aspects of a decision support system, including queries and data maintenance. The benchmark provides a representative evaluation of performance as a general purpose decision support system.

It includes 7 fact tables, 17 dimension tables, with an average of 18 columns per table and 99 test queries.

You can find more information about TPC-DS at https://www.tpc.org/tpcds/.

Running TPC-DS Benchmark on Databend

This section describes the steps to run the TPC-DS benchmark on Databend and provides the related scripts. You can find more detail information at: https://github.com/datafuselabs/databend/tree/main/benchmark/tpcds.

Step 1: Generate TPC-DS test data

Leverage duckdb to generate TPC-DS data:

INSTALL tpcds;
LOAD tpcds;
SELECT * FROM dsdgen(sf=1);
EXPORT DATABASE 'TARGET_DIR' (FORMAT CSV, DELIMITER '|');

Step 2: Load TPC-DS data into Databend

./load_data.sh

Step3: Run TPC-DS queries

databend-sqllogictests --handlers mysql --database tpcds --run_dir tpcds --bench 

We used ClickBench on March 3rd to evaluate the performance of Databend in comparison to other OLAP databases. ClickBench utilizes the HITS dataset from a production environment to measure database performance. The benchmark comprises 50 databases and assesses the data import time and 43 other queries. The total ranking of a database is determined by its overall performance across all testing scenarios.

Databend Ranked High

To demonstrate the real performance of Databend, we did not make any special optimizations for the testing scenarios. We used all default configurations without any parameter tuning, did not partition the data based on a specific column during the import and table creation, and did not cache the original data or query results, only caching metadata and indexes.

We submitted tests for the three most common types of Amazon EC2 instances:

  • c6a.metal, 500GB gp2 (192 cores)
  • c6a.4xlarge, 500GB gp2 (16 cores)
  • c5.4xlarge, 500GB gp2 (16 cores)

We got good results. Databend's data load performance ranked first for all the three instance types.

Databend Load Time

Databend also performed exceptionally in hot run queries:

What Made it Happen

Thanks to the new expression system in Databend, all operators have been implemented with vectorization, and all operators have domain-based value inference capabilities. Based on this, we can apply a powerful constant folding framework to perform multi-level data pruning, as well as skip unnecessary data blocks as much as possible.

In addition, the scheduling ability of the pipeline and the functionality of the aggregation operator have been further strengthened, allowing for efficient scheduling of CPU and IO resources, thereby achieving optimal performance.

What's Next

The gap between the top three in the ClickBench list is not significant. Therefore, even in scenarios where it is not particularly good at, combining high-performance computing power, Databend can also achieve good advantages. Since Databend uses default configurations and disables DataCache, the comparison has little significance in cold run scenarios. We can also optimize the table creation statement (e.g., import partition by UserID, optimize Q17 and other scenarios that aggregate by UserId) or add some parameter tuning to further improve performance.

Databend's ultimate goal is to provide users with ultimate performance and easy-to-use product experience in common scenarios. Benchmarking is mainly to provide us with a way to measure performance and improve product quality. ClickBench testing is very representative, so we have integrated ClickBench into the performance testing CI of various versions and PRs, making it easy for developers to observe performance degradation and improvement and optimize product development.

This post gives you a general idea about the TPC-H benchmark and explains how to run a TPC-H benchmark on Databend.

What's TPC-H?

TPC-H is a decision support benchmark. It consists of a suite of business-oriented ad hoc queries and concurrent data modifications. The queries and the data populating the database have been chosen to have broad industry-wide relevance. This benchmark illustrates decision support systems that examine large volumes of data, execute queries with a high degree of complexity, and give answers to critical business questions.

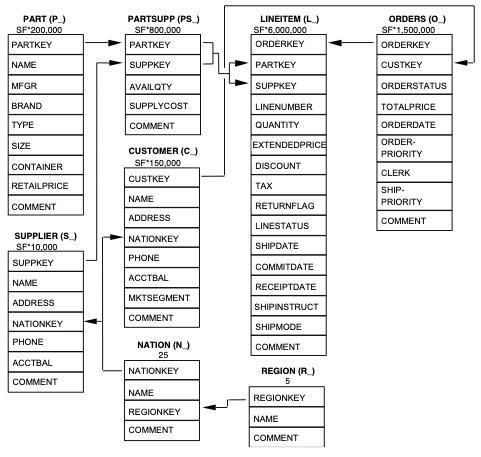
The TPC-H benchmark simulates a system for online sales of parts and components and defines eight tables in total. The structure, data volume, and mutual relationship of each table are shown in the figure below:

The benchmark workload consists of twenty-two decision support queries that must be executed as part of the TPC-H benchmark. Each TPC-H query asks a business question and includes the corresponding query to answer the question. More information about TPC-H can be found at https://www.tpc.org/tpch/.

Running TPC-H Benchmark on Databend

This section describes the steps to run the TPC-H benchmark on Databend and provides the related scripts.

Step 1: Generate test data with TPC-H Docker

The following code pulls a docker image and allocates the data in the path where you are running the TPC-H benchmark.

docker pull ghcr.io/databloom-ai/tpch-docker:main
docker run -it -v "$(pwd)":/data ghcr.io/databloom-ai/tpch-docker:main dbgen -vf -s 1

TPC-H comes with various data set sizes to test different scale factors. You can use the -s option to set scale factor in the command (for example, the code above sets the scale factor to 1). For more information about the command, see https://github.com/databloom-ai/TPCH-Docker.

SF (Gigabytes)Size
1Consists of the base row size (several million elements).
10Consists of the base row size x 10.
100Consists of the base row size x 100 (several hundred million elements).
1000Consists of the base row size x 1000 (several billion elements).

Step 2: Create database and tables

CREATE DATABASE IF NOT EXISTS tpch;

USE tpch;

CREATE TABLE IF NOT EXISTS nation
(
n_nationkey INTEGER NOT NULL,
n_name VARCHAR NOT NULL,
n_regionkey INT NOT NULL,
n_comment VARCHAR
);

CREATE TABLE IF NOT EXISTS region
(
r_regionkey INT NOT NULL,
r_name VARCHAR NOT NULL,
r_comment VARCHAR
);

CREATE TABLE IF NOT EXISTS part
(
p_partkey INT NOT NULL,
p_name VARCHAR NOT NULL,
p_mfgr VARCHAR NOT NULL,
p_brand VARCHAR NOT NULL,
p_type VARCHAR NOT NULL,
p_size INT NOT NULL,
p_container VARCHAR NOT NULL,
p_retailprice FLOAT NOT NULL,
p_comment VARCHAR NOT NULL
);

CREATE TABLE IF NOT EXISTS supplier
(
s_suppkey INT NOT NULL,
s_name VARCHAR NOT NULL,
s_address VARCHAR NOT NULL,
s_nationkey INT NOT NULL,
s_phone VARCHAR NOT NULL,
s_acctbal FLOAT NOT NULL,
s_comment VARCHAR NOT NULL
);

CREATE TABLE IF NOT EXISTS partsupp
(
ps_partkey INT NOT NULL,
ps_suppkey INT NOT NULL,
ps_availqty INT NOT NULL,
ps_supplycost FLOAT NOT NULL,
ps_comment VARCHAR NOT NULL
);

CREATE TABLE IF NOT EXISTS customer
(
c_custkey INT NOT NULL,
c_name VARCHAR NOT NULL,
c_address VARCHAR NOT NULL,
c_nationkey INT NOT NULL,
c_phone VARCHAR NOT NULL,
c_acctbal FLOAT NOT NULL,
c_mktsegment VARCHAR NOT NULL,
c_comment VARCHAR NOT NULL
);

CREATE TABLE IF NOT EXISTS orders
(
o_orderkey INT NOT NULL,
o_custkey INT NOT NULL,
o_orderstatus VARCHAR NOT NULL,
o_totalprice FLOAT NOT NULL,
o_orderdate DATE NOT NULL,
o_orderpriority VARCHAR NOT NULL,
o_clerk VARCHAR NOT NULL,
o_shippriority INT NOT NULL,
o_comment VARCHAR NOT NULL
);

CREATE TABLE IF NOT EXISTS lineitem
(
l_orderkey INT NOT NULL,
l_partkey INT NOT NULL,
l_suppkey INT NOT NULL,
l_linenumber INT NOT NULL,
l_quantity FLOAT NOT NULL,
l_extendedprice FLOAT NOT NULL,
l_discount FLOAT NOT NULL,
l_tax FLOAT NOT NULL,
l_returnflag VARCHAR NOT NULL,
l_linestatus VARCHAR NOT NULL,
l_shipdate DATE NOT NULL,
l_commitdate DATE NOT NULL,
l_receiptdate DATE NOT NULL,
l_shipinstruct VARCHAR NOT NULL,
l_shipmode VARCHAR NOT NULL,
l_comment VARCHAR NOT NULL
);

Step 3: Load test data to Databend

This step uses the HTTP API v1/streaming_load to load the test data to Databend. More information about this API can be found at https://docs.databend.com/doc/load-data/load/local.

The code below connects to Databend using the Root user. Please note that the root user only works when you access Databend from localhost. You will need to create new users and grant proper privileges first to connect to Databend remotely.

#!/bin/bash

for t in customer lineitem nation orders partsupp part region supplier
do
echo "$t"
insert_sql="insert into tpch.$t file_format = (type = CSV skip_header = 0 field_delimiter = '|' record_delimiter = '\n')"
curl -s -u root: -XPUT "http://localhost:8000/v1/streaming_load" -H "insert_sql: ${insert_sql}" -F 'upload=@"./'$t'.tbl"' > /dev/null 2>&1
done

Step 4: Run TPC-H queries

All the definitions of the TPC-H queries can be found at https://www.tpc.org/tpc_documents_current_versions/pdf/tpc-h_v3.0.1.pdf. You can simply run them by copying and pasting the scripts to Databend.

The Databend team ran the TPC-H benchmark around two months ago and uploaded their queries and results to GitHub. You can find them at https://github.com/datafuselabs/databend/tree/main/tests/suites/0_stateless/13_tpch. Please note that Databend now uses the new planner by default, so you DO NOT need to enable it any more before running the queries.