
Introducing BendDeploy: The New Way to Visually Manage Databend [Bonus: 3-Month Free Trial]
 JeremyMay 13, 2025
![Introducing BendDeploy: The New Way to Visually Manage Databend [Bonus: 3-Month Free Trial]](/img/resource/default-cover.svg)
![Introducing BendDeploy: The New Way to Visually Manage Databend [Bonus: 3-Month Free Trial]](/img/blog/sync/dcover.png)
What is BendDeploy?
BendDeploy is a standardized, Kubernetes-based private deployment and management platform provided by Databend. It offers a one-stop solution for managing Databend clusters, enabling fast and secure deployment and administration of multiple clusters and tenants. With an intuitive user interface, BendDeploy delivers a simple and user-friendly visual operation experience that significantly improves operational efficiency, reduces errors and downtime, and enhances service quality and stability.
BendDeploy Features
BendDeploy offers a wide range of capabilities, including:
- Multi-Tenant Management: Supports multi-tenancy with full tenant isolation and management.
- Cluster Deployment: Easily launch a complete Databend cluster with one click using BendDeploy.
- Cluster Management:
- Cluster Overview: View cluster status, configuration details, connection info, and more.
- Cluster Scaling: Quickly scale the number of warehouse instances up or down with a single click.
- Rolling Upgrade: Perform rolling upgrades of Databend cluster versions.
- Cluster Rollback: Roll back to a previous cluster version with minimal downtime.
- Cluster Restart: Perform rolling restarts of nodes within a cluster.databend-query
- Node Details: View real-time status and configuration for individual nodes.
- External Meta Takeover: If you’ve already deployed Databend, BendDeploy can take over the external Meta service—only stateless nodes need to be deployed afterward.databend-query
- Parameter Configuration: Customize configuration files for warehouse clusters, including resource limits and Databend-specific parameters.
- Monitoring Integration: Connect to external Prometheus instances to monitor cluster metrics.
- Log Viewing: After enabling tenant-level log collection, easily access logs such as logs and profile logs.databend-query
- SQL Worksheet: Use the built-in web UI to run SQL queries directly on a selected warehouse within a tenant.
- User Management: Manage users, assign them to tenants, remove them, and control roles and permissions.
With BendDeploy, nearly all Databend operations and maintenance tasks can be performed through a visual interface—no more managing clusters from the shell. It's accurate, efficient, and user-friendly.
BendDeploy Architecture
Let’s first take a look at the BendDeploy architecture from a component-level perspective:
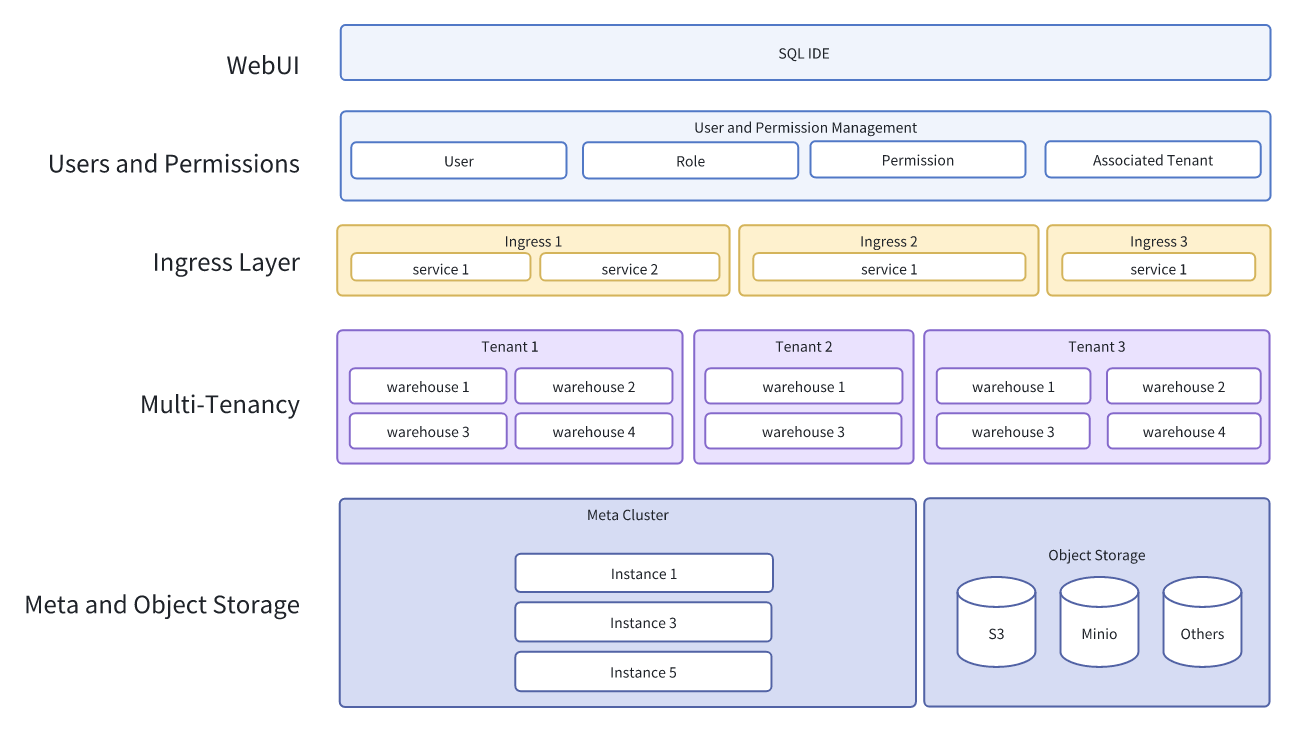
Object Storage: Databend follows the best practice of storing data in object storage.
Meta: Only one Meta cluster needs to be installed per platform, or you can connect to an existing external Meta cluster.
Warehouse: A compute cluster consisting of a group of
databend-query
Tenant: A tenant is a logical unit managed by the control platform. One platform can manage multiple tenants, and each tenant can contain multiple warehouses.
Ingress Layer: Each tenant has an ingress component that exposes database connection services via domain names.
User Management: This module manages users, roles, and permission-related settings.
Web UI: A visual SQL IDE for running SQL queries.
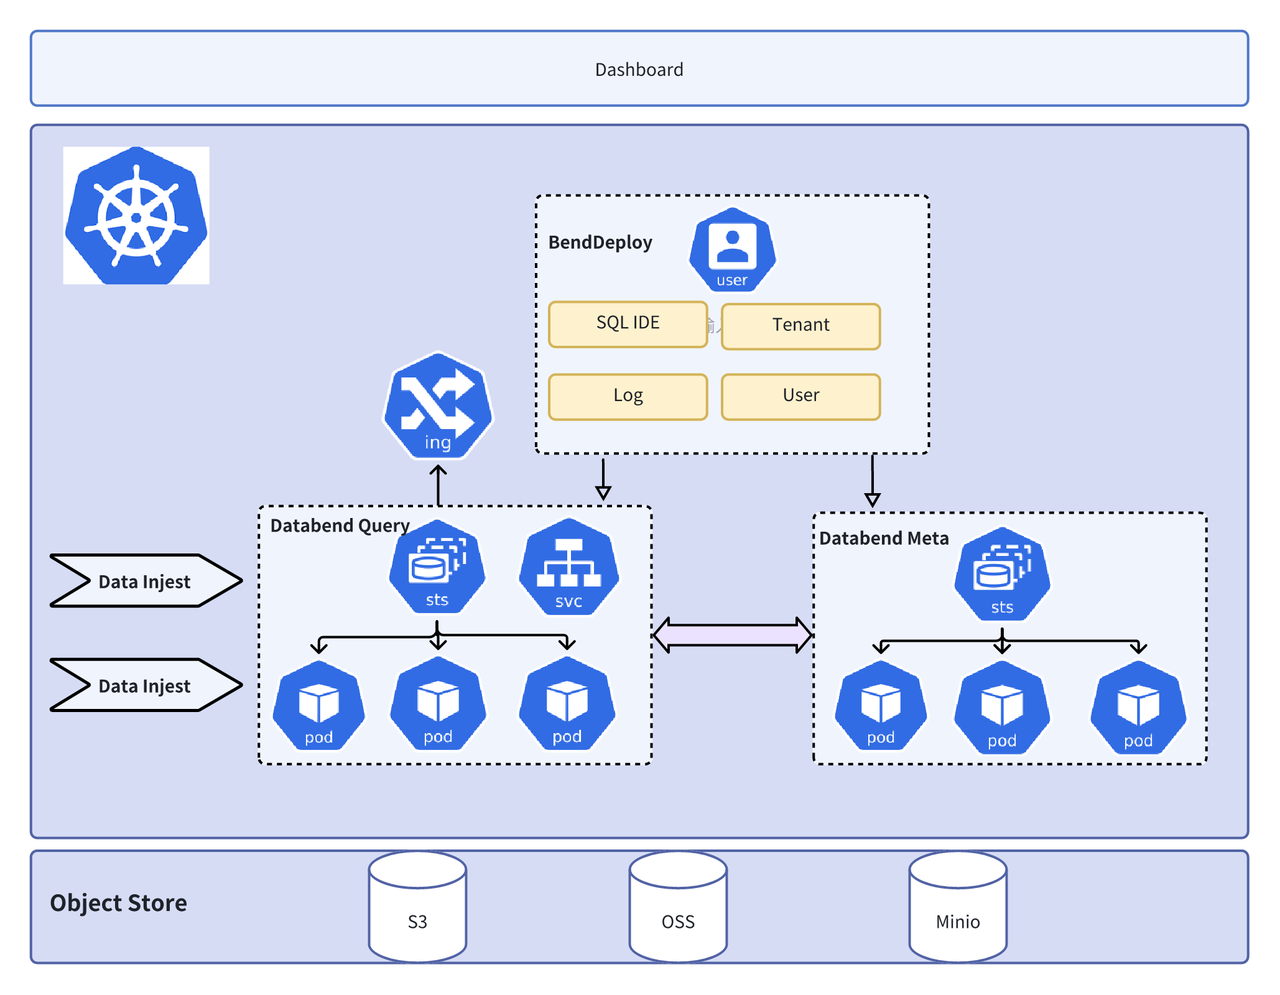
From an administrator's perspective, the architecture illustrates the relationships between each component:
BendDeploy Deployment
As a cloud-native lakehouse, Databend is recommended to be deployed in a Kubernetes (K8s) environment. BendDeploy is currently limited to K8s-only deployments. Therefore, before deploying BendDeploy, a Kubernetes cluster must be set up. This guide assumes that the user already has a K8s cluster ready.
Install the Logging Components
BendDeploy collects logs from Databend. To enable this, we configure an OTLP endpoint for Databend to collect
query detail logs
query profile logs
To deploy the related logging components, download the Databend logging Helm chart, which comes pre-configured to collect logs from Databend components. This includes configurations for Vector and the log collector.
To complete the setup, simply update the object storage settings in the
values.yaml
warehouseLogCollector.s3
endpoint
auth
warehouseLogCollector:
  enabled: true
  replicas: 1
  nameOverride: warehouse-log-collector
  fullnameOverride: warehouse-log-collector
  s3:
    endpoint: "S3 endpoint"
    bucket: "s3.bucket"
    region: "us-east-1"
    auth:
      accessKeyId: "access_key_id"
      secretAccessKey: "secret_key"
    batch:
      maxBytes: 10485760  # 10MB
      timeoutSecs: 60    # 1min
Then:
helm upgrade --install logging ./logging --namespace=logging --create-namespace
Use the following command to check whether the logging components have been successfully installed:
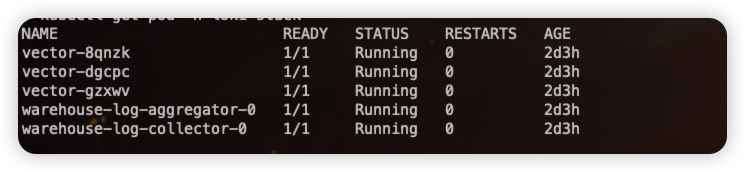
The logging component is not mandatory. If you do not need to enable the platform's logging collection feature, you can choose not to install it for now.
Install BendDeploy
Download Helm Chart & Modify values.yaml
First, download the BendDeploy Helm chart file. Then, modify the
values.yaml
configmap-benddeploy.yaml
ingress
apiVersion: v1
kind: ConfigMap
metadata:
  name: benddeploy-config
  namespace: benddeploy
data:
  config.json: |
    {
      "env": "test",
      "namespace": "benddeploy",
      "imageRegistry": "",
      "secretKey": "",
      "lokiHost": "",
      "grafanaEndpoint": "http://grafana.monitoring.svc.cluster.local:80",
      "promEndpoint": "thanos-query.monitoring.svc.cluster.local:9090",
      "logCollectorEndpoint": "http://warehouse-log-collector.logging.svc.cluster.local:4318",
      "salt": "salt",
      "jwt": {
        "kind": "static",
        "static": {
          "signingKey": "-----BEGIN EC PRIVATE KEY-----\nMHcCAQEEIN2zd9w6nMcFpP0FuUb3413RSgo92nhtGYlXSBfgQD9yoAoGCCqGSM49\nAwEHoUQDQgAEJI4I7jG0eVUMTo8TkrOso1VTWBddEaUD2UI7efrYzmI2zFocd7Ga\nfLbl54WFHeJ75ur0ED8EUf7QPEmgkr5QHQ==\n-----END EC PRIVATE KEY-----",
          "pubKey": "-----BEGIN PUBLIC KEY-----\nMFkwEwYHKoZIzj0CAQYIKoZIzj0DAQcDQgAEJI4I7jG0eVUMTo8TkrOso1VTWBdd\nEaUD2UI7efrYzmI2zFocd7GafLbl54WFHeJ75ur0ED8EUf7QPEmgkr5QHQ==\n-----END PUBLIC KEY-----"
        }
      },
      "db": {
        "postgresDSN": "postgres://postgres:postgres@pg-benddeploy.benddeploy.svc.cluster.local:5432/default?sslmode=disable"
      },
      "adminUsers": [
        "databend",
        "admin"
      ],
      "jwtKeyFile": "http://benddeploy-service.benddeploy.svc.cluster.local:8080/.well-known/jwks.json",
      "oidcProvider": "https://oidc.eks.us-east-2.amazonaws.com/id/120A6F5E89F8F14E7A1E5E15FE48196D/keys"
    }
oidcProvider: Allows Kubernetes to integrate with external identity providers, enabling users to access the Kubernetes cluster using their existing enterprise identity credentials.
For production clusters, you need to override the following parameters in the
configmap-benddeploy.yaml
- imageRegistry: The image repository for Databend Docker images. You need to deploy your own registry and upload the corresponding Databend image. The official image repo is available at Docker Hub. If the deployed machine can access the public internet, this parameter can be left empty, and the official image from Docker Hub will be used.
- registryUsername: The username for the image registry.
- registryPassword: The password for the image registry. Leave empty if no authentication is required.
- repoNamespace: The namespace in the registry where anddatabend-queryDocker images are stored. For example, if the registry isdatabend-metaand the namespace isregistry.databend.local, the image would be uploaded asdatafuselabs.registry.databend.local/datafuselabs/databend-query:tag
- promEndpoint: The endpoint for the Prometheus server provided by the user.
- logCollectorEndpoint: The endpoint for the log collector.
- grafanaEndpoint: The endpoint for the Grafana server provided by the user.
- db.postgresDSN: The DSN for the PostgreSQL database. If is true, this value will be ignored (the system will create a simple PostgreSQL service, but note that this is for testing purposes only; for production environments, use an external PostgreSQL service).values.postgres.enabled
- oidcProvider: The OIDC provider used for authentication in the Kubernetes cluster.
After completing the configuration modifications, execute:
helm install benddeploy -n benddeploy --create-namespace ./chart --set image=public.ecr.aws/databendlabs/benddeploy:v1.0
You can find all the released versions of the BendDeploy Docker images at https://gallery.ecr.aws/databendlabs/benddeploy.
After a successful run, check the BendDeploy installation status by executing:

Access the web interface in your browser
After a successful deployment, you can open the BendDeploy page by visiting the domain configured in the ingress.

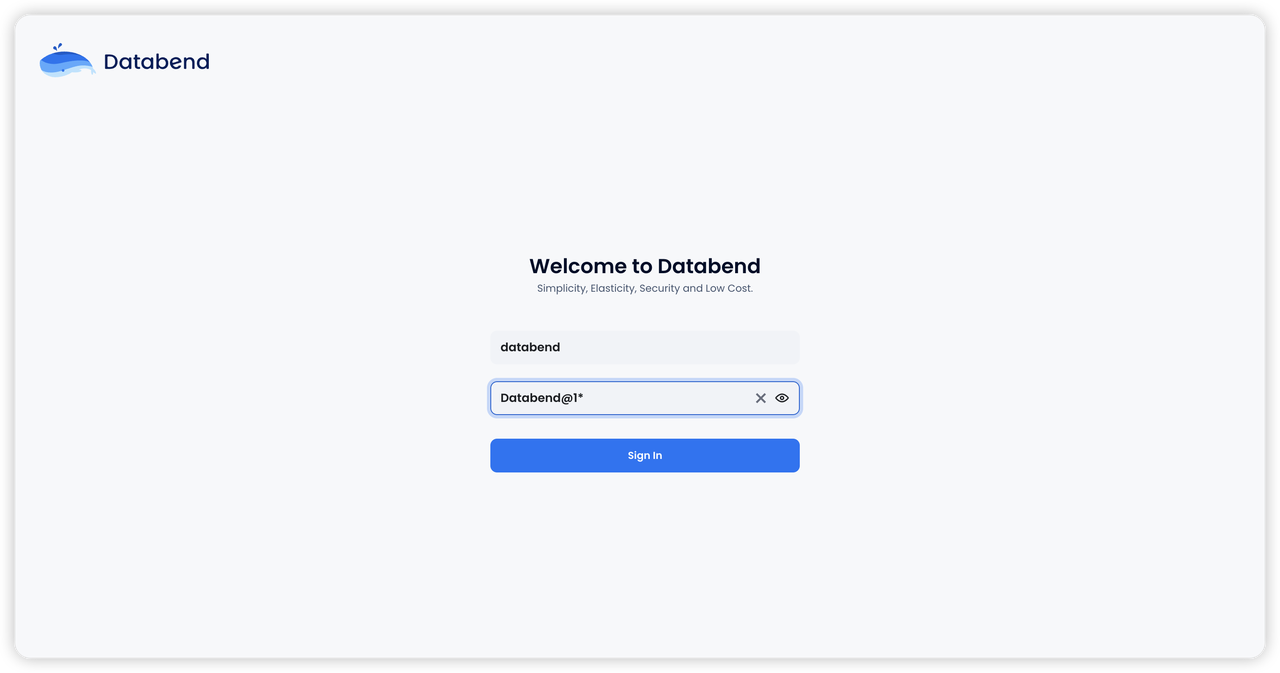
The default initialization username and password for Databend are: databend/Databend@1*.
After logging into the system, you can change the password in the user management module.
Please note that this account password is only for the BendDeploy management platform and is not the username and password for the Databend database!
Platform Configuration
Cloud-native technologies have become highly mature, and it is believed that most companies' cloud management platforms already have monitoring and alerting components like Grafana and Prometheus installed. Therefore, BendDeploy no longer includes these components by default but provides an entry point for users to configure them.
During the configuration, connectivity with the server will also be verified.
BendDeploy User Manual
Create a New Tenant
After the deployment is complete, let's create the first tenant.
First, let's watch the video tutorial on how to create a new tenant:
Name the new tenant
Specify an external Meta or create a Meta cluster.
If you have created a Meta cluster in BendDeploy, you can select the built-in Meta here. Alternatively, if you have an external Meta cluster that you want to integrate with BendDeploy, you can provide the information for your custom Meta.

When you click "Next," the system will validate the availability of the Meta cluster you specified. Once the verification passes, you can continue with the next steps of the process.
Configure Object Storage
The best practice for Databend is to store data in object storage. Here, we configure the user's object storage-related information.
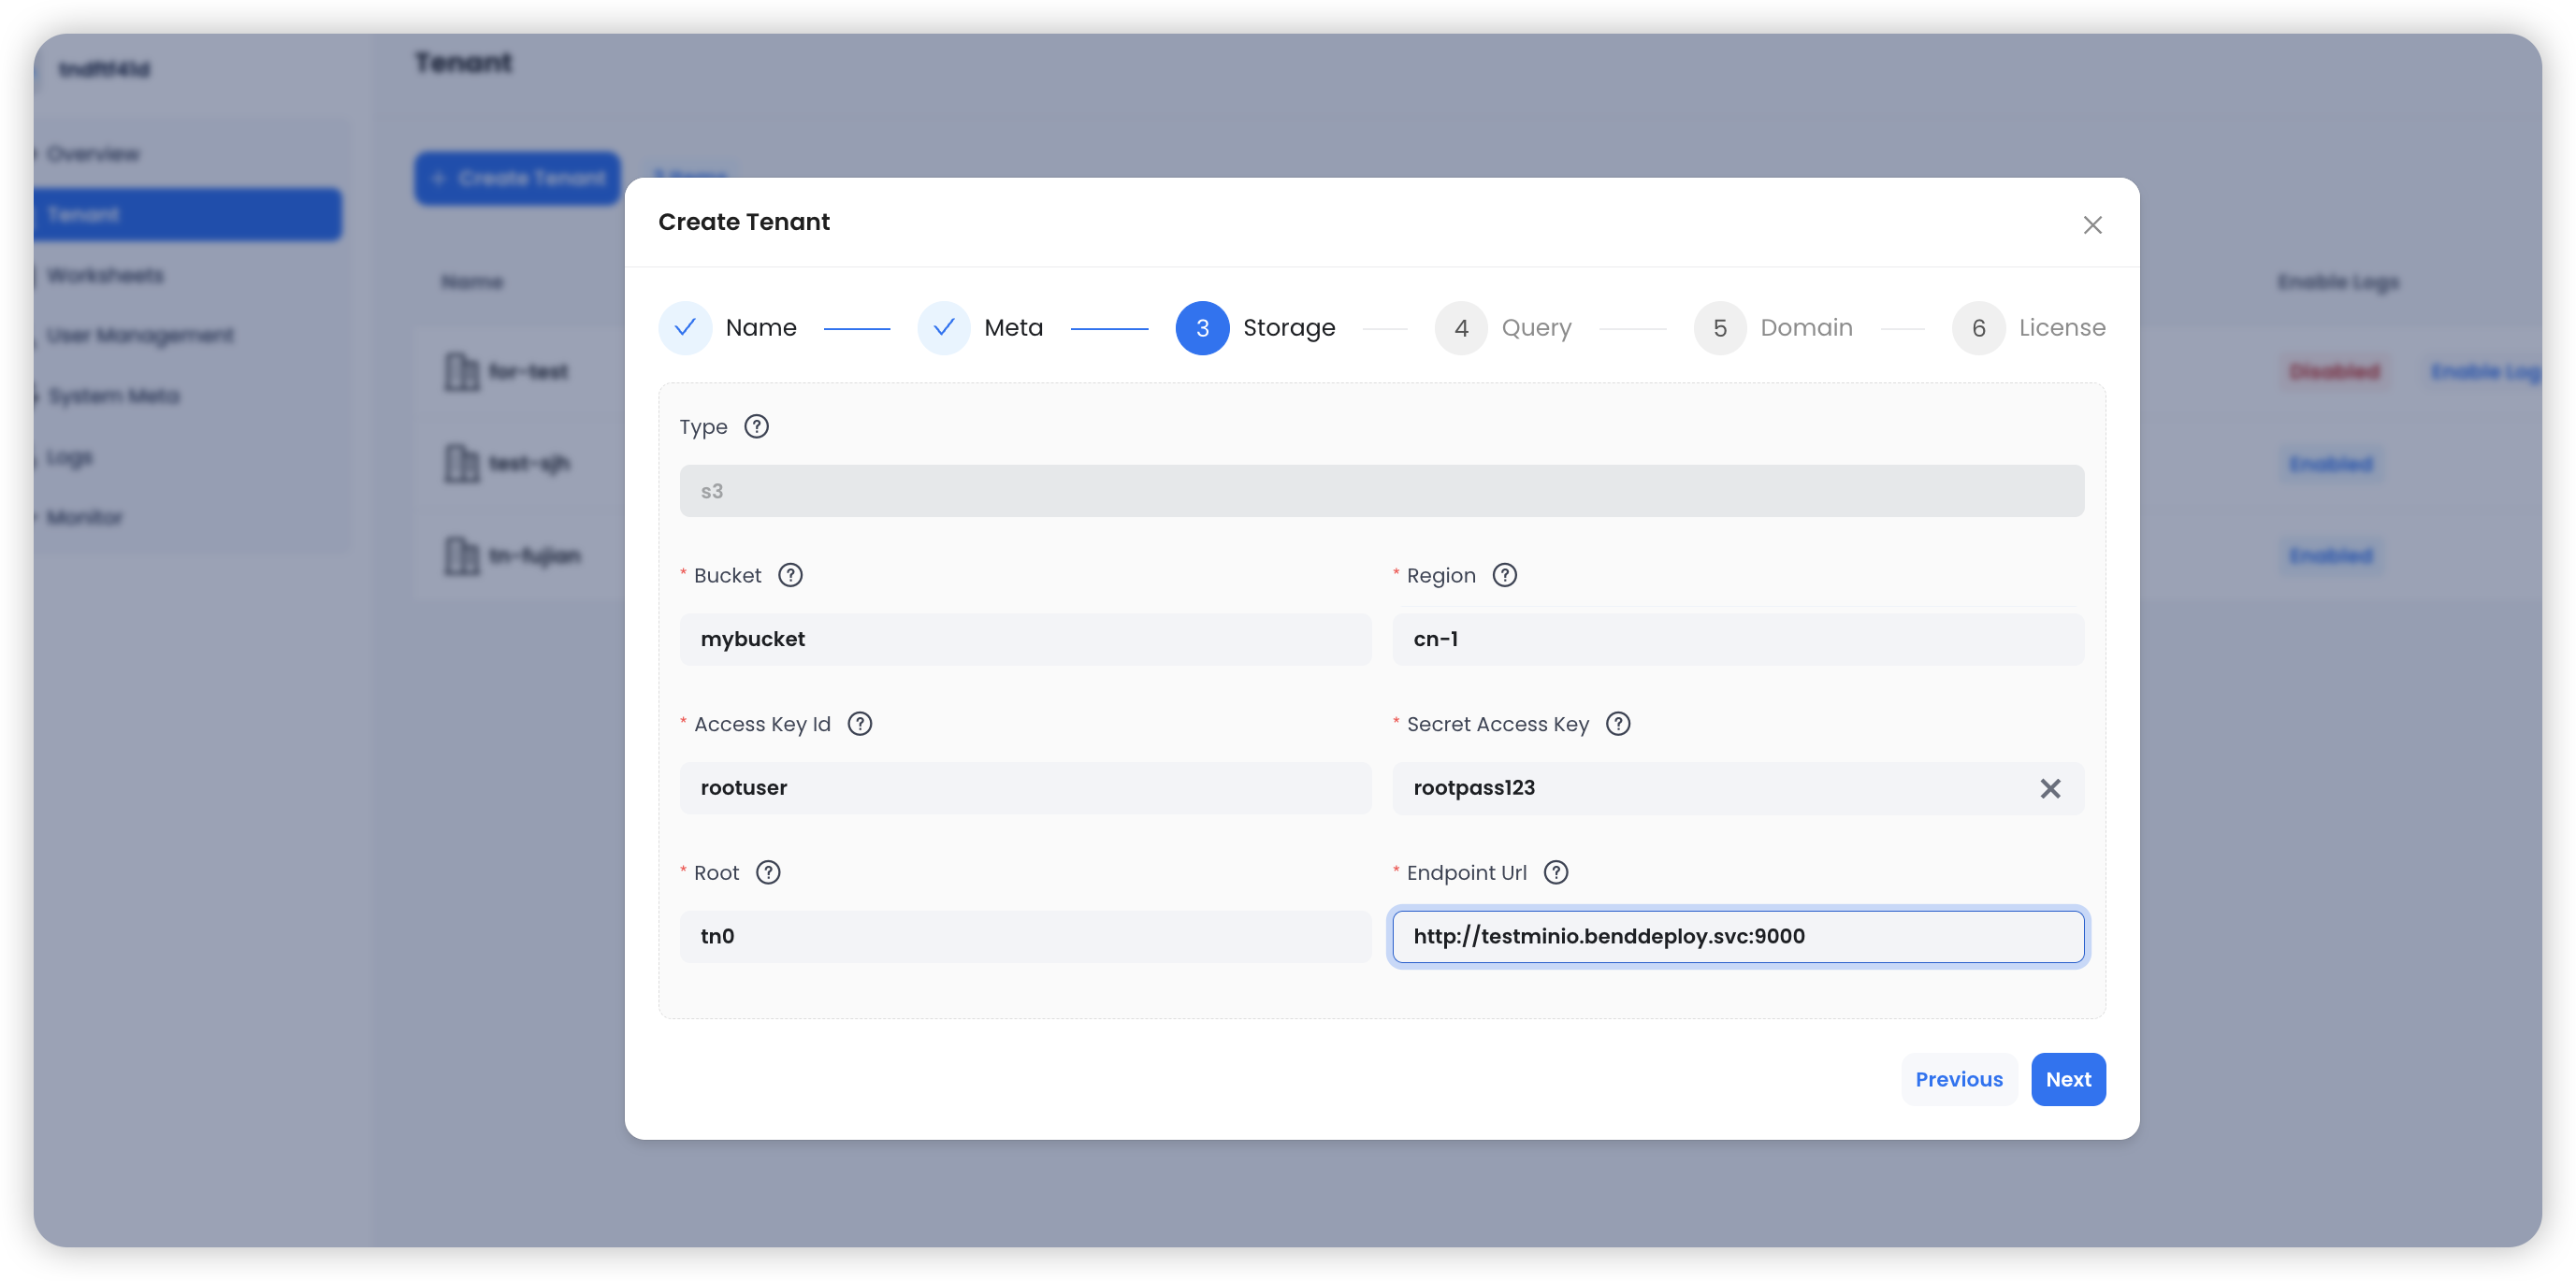
After configuring the object storage, clicking "Next" will trigger a validation to ensure the accuracy of the configuration.
Configure Databend Query
Here, we configure the initial username and password for Databend Query, which will be used to connect to Databend for the first time.
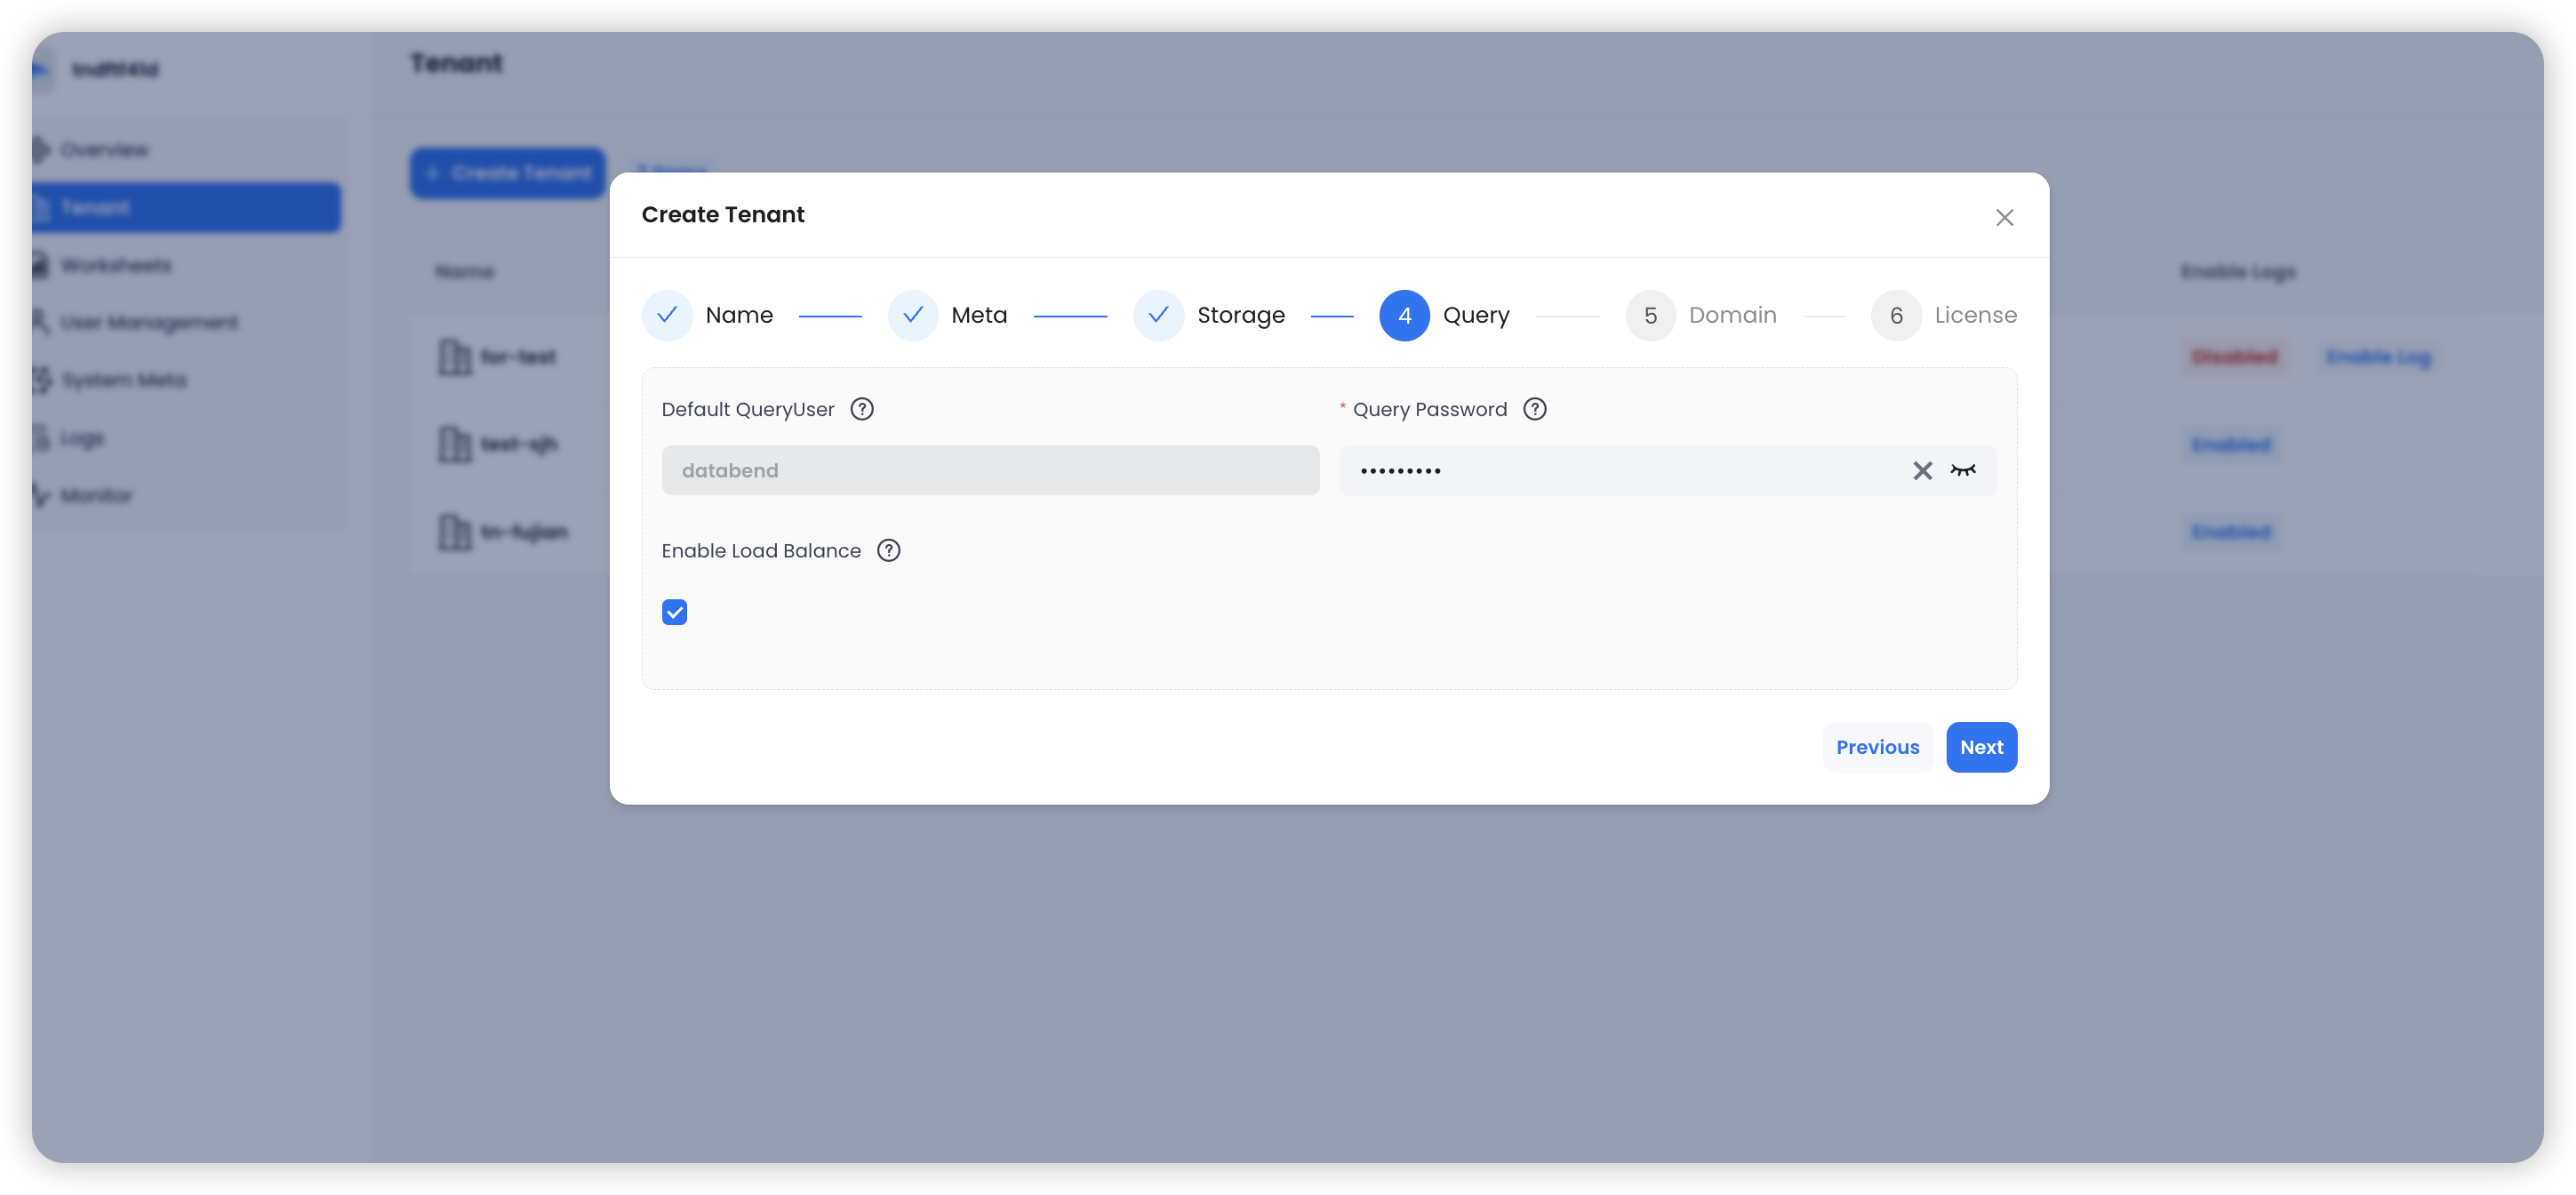
If the "Enable Load Balance" option is selected, a load balancing strategy will be configured on the
databend-query
databend-query
Configure a wildcard domain
The wildcard domain provided by the user will offer an access point for each warehouse. For example, if the domain
*.``databend.com
test-1
test-1.databend.com

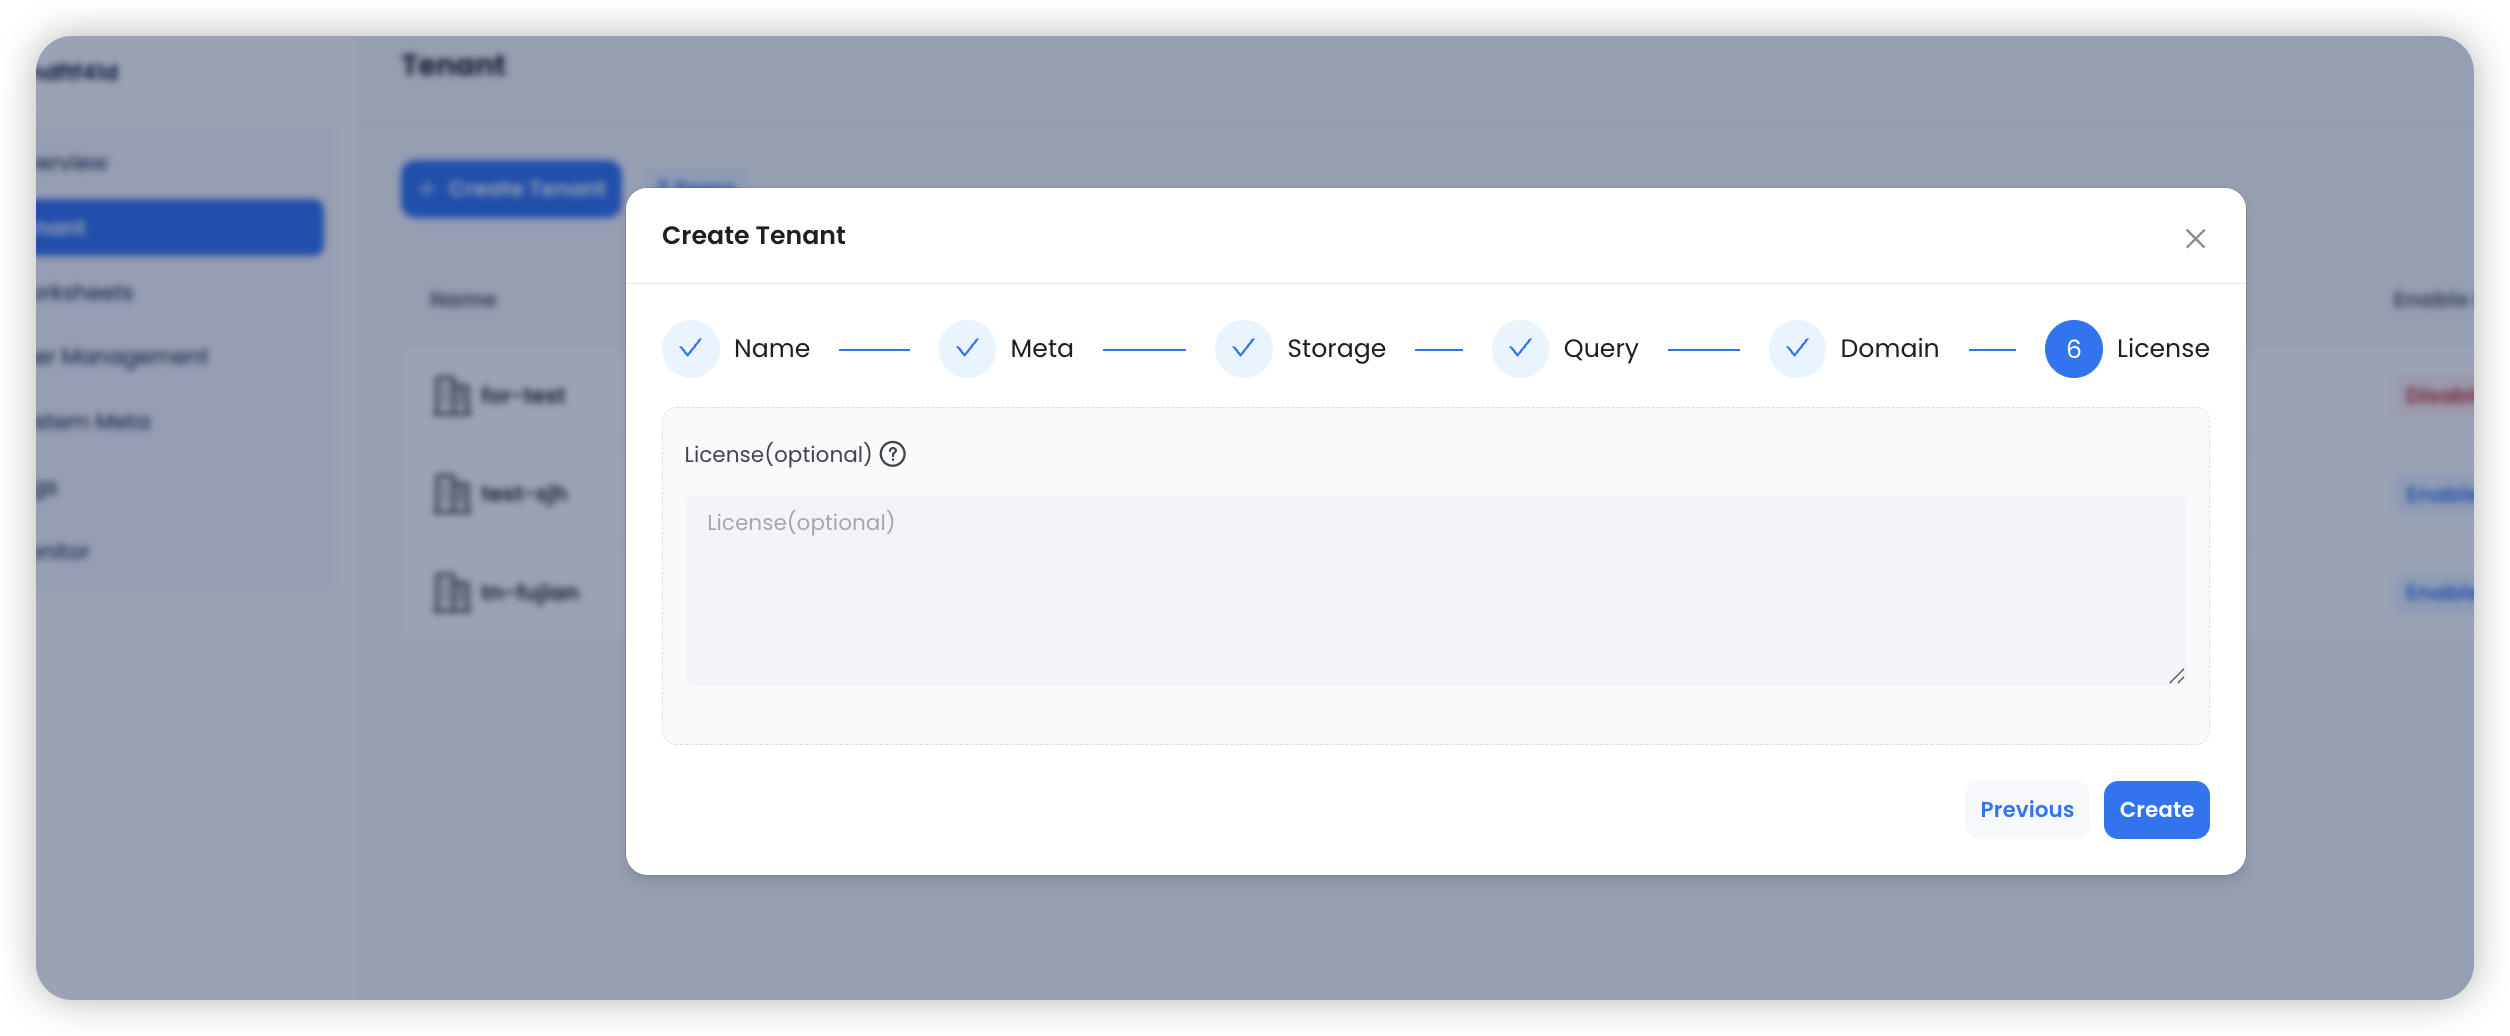
Enter Databend Enterprise License
If you have purchased the Databend Enterprise Edition, this step will involve entering the Databend License, after which you will be able to use the enterprise-grade features in Databend.
Create a warehouse
Under the tenant we just created, we can now create a warehouse . Let's first watch the overall video tutorial.
Click "Create Warehouse," then fill in the warehouse name, select the version, specify the number of instances and resource configuration for the cluster, and set tags for the cluster before creating it.
Note that you need to upload the Databend Docker image to the registry within the Kubernetes cluster in advance. This way, you can select the desired Databend version from the image dropdown list during deployment.
For more information about Databend's runtime parameters and settings, please refer to the documentation: https://docs.databend.com/guides/deploy/references/node-config/query-config
After the creation is complete, and you will be able to see the successfully created warehouse.
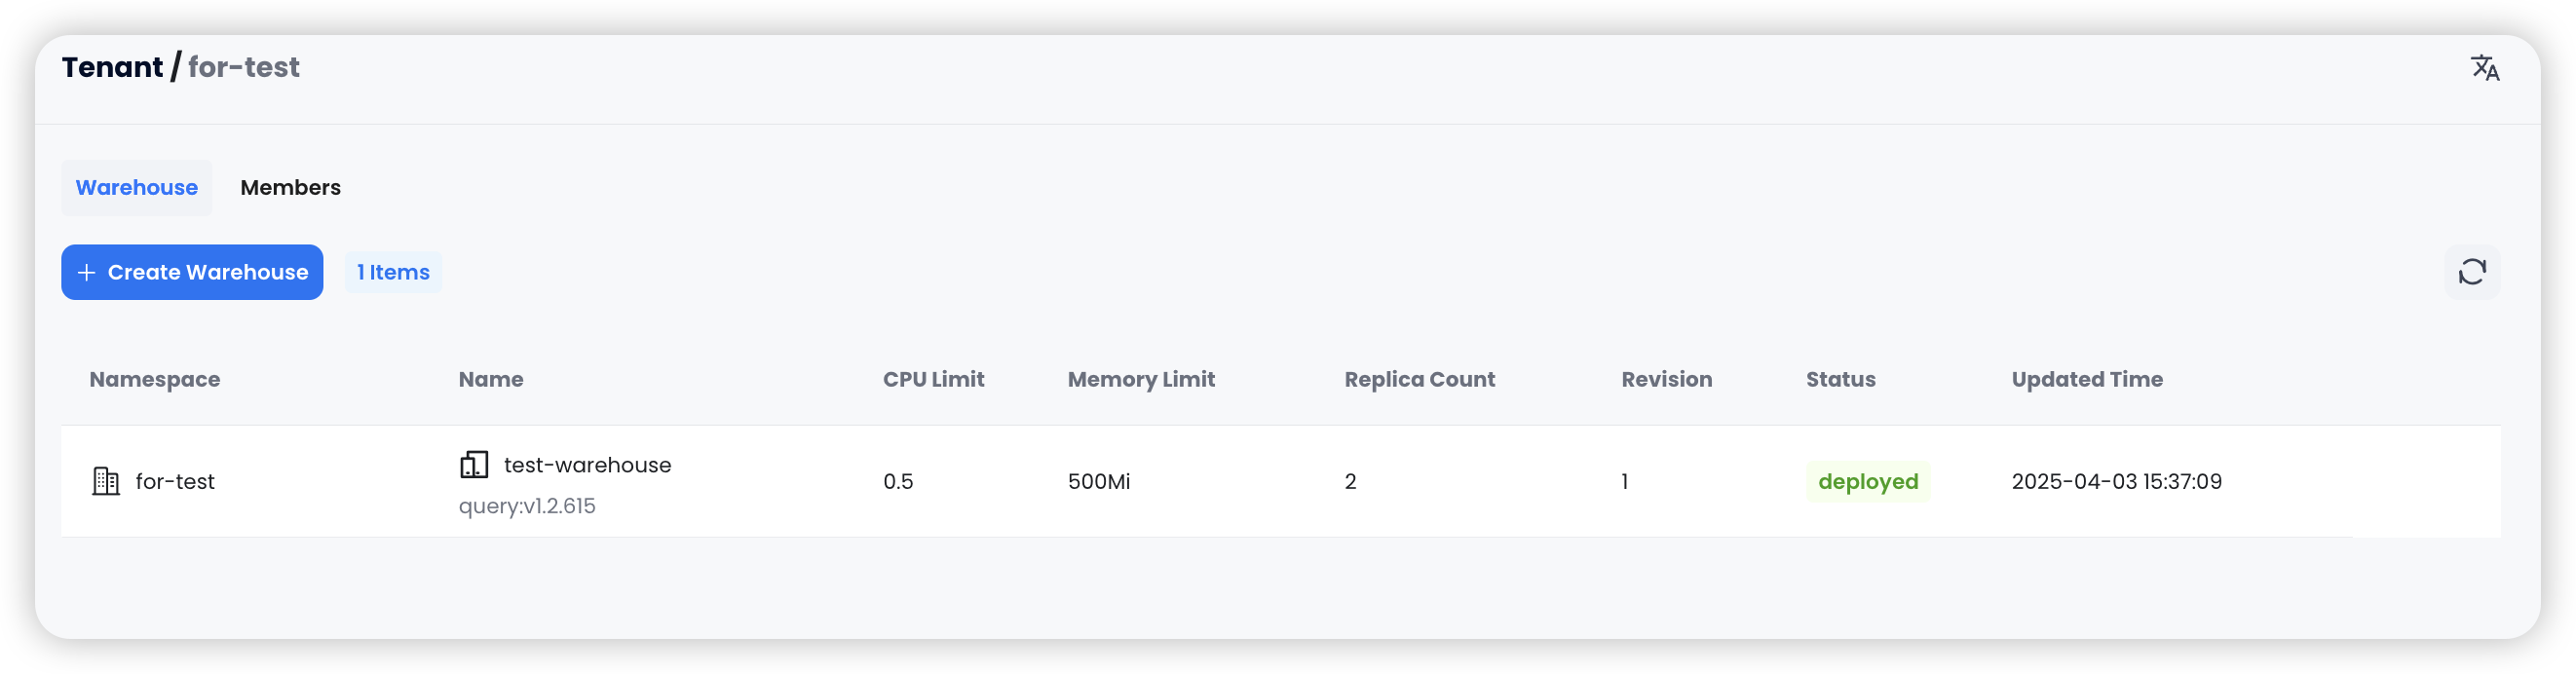
Manage warehouses
After clicking the dropdown menu on the right, you can perform operations such as scaling the warehouse, rolling restart, updating, deleting, and viewing details.

If the ingress domain is configured correctly, you can use BendSQL to directly connect to the cluster.
Click "Connect" to obtain the connection string:
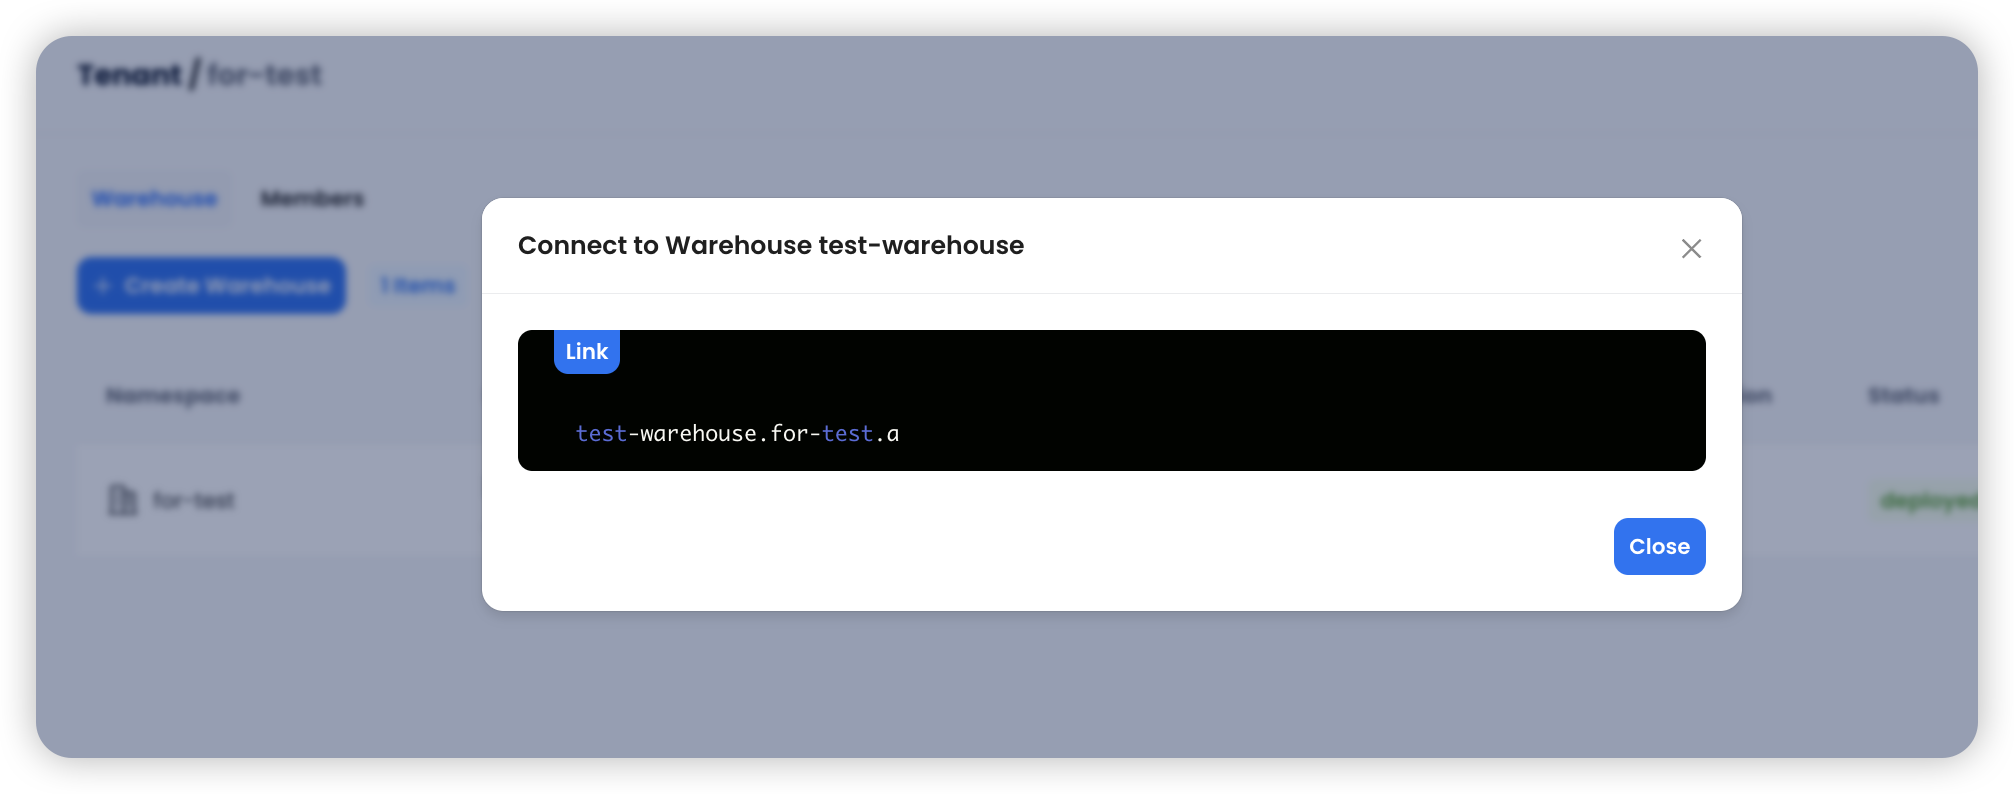
Then,
bendsql -u databend -h test-warehouse.for-test.a -P 8000 -p databend
Enable Logging
The logging module in BendDeploy is quite special. Since Databend itself has strong capabilities for log storage, querying, and analysis, we store all warehouse-related logs directly in Databend. Additionally, you can enable or disable log collection on a per-tenant basis, which further helps reduce the user's log storage costs.
Initialize Logging Module
When BendDeploy is first deployed, the logging module is disabled by default. Users need to create at least one tenant before enabling log collection. This is because a dedicated warehouse for user log collection needs to be created within the tenant.
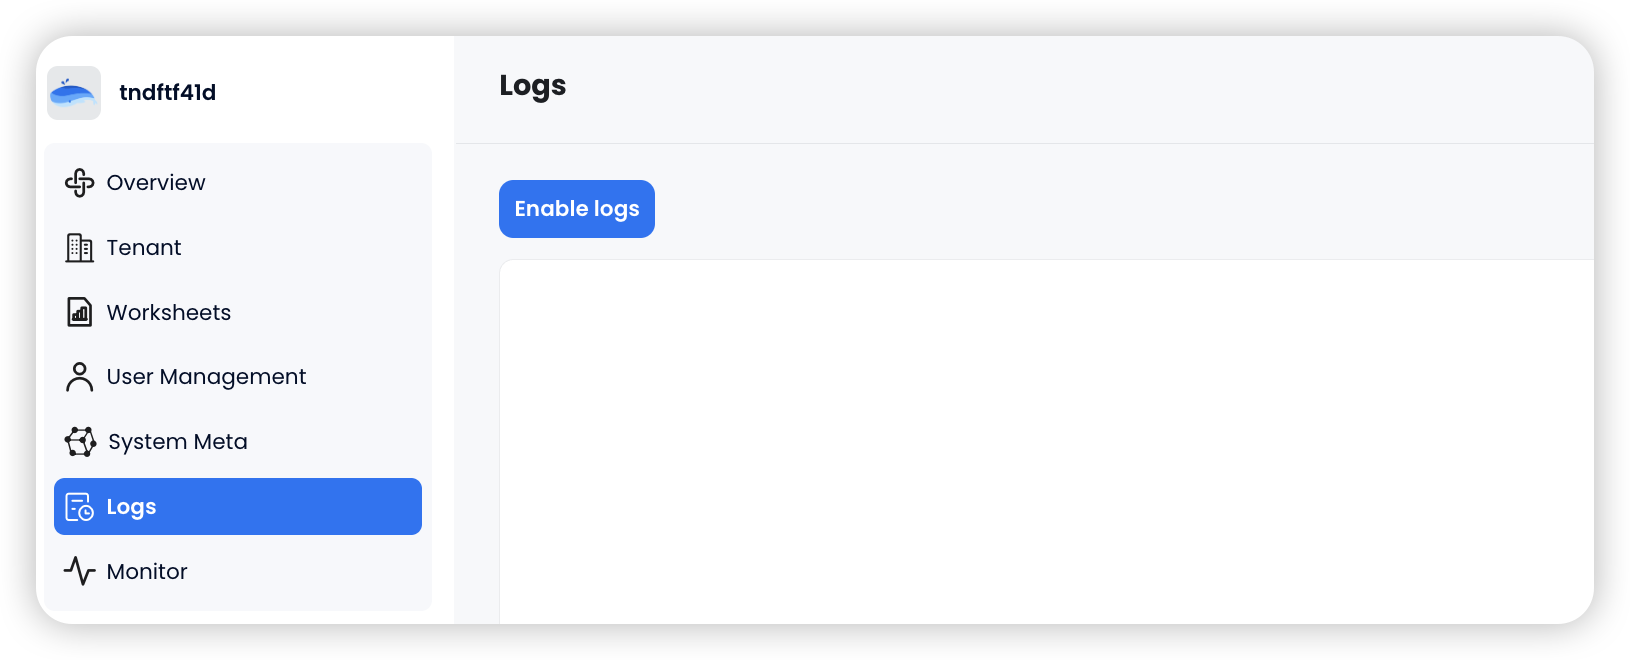
After clicking the "Enable logs" button, the log component will begin its initialization.
Select the tenant of the warehouse where user logs will be collected. You can use the existing warehouse host within the tenant. If you do not provide a warehouse host, the system will automatically create a warehouse named
internale-log-collector
Once the log module is initialized, log collection will be enabled. There may be a delay in log refreshing. If you want to view the logs immediately, you can click the "Flush" button on the tenant, which will immediately refresh the logs to Databend.
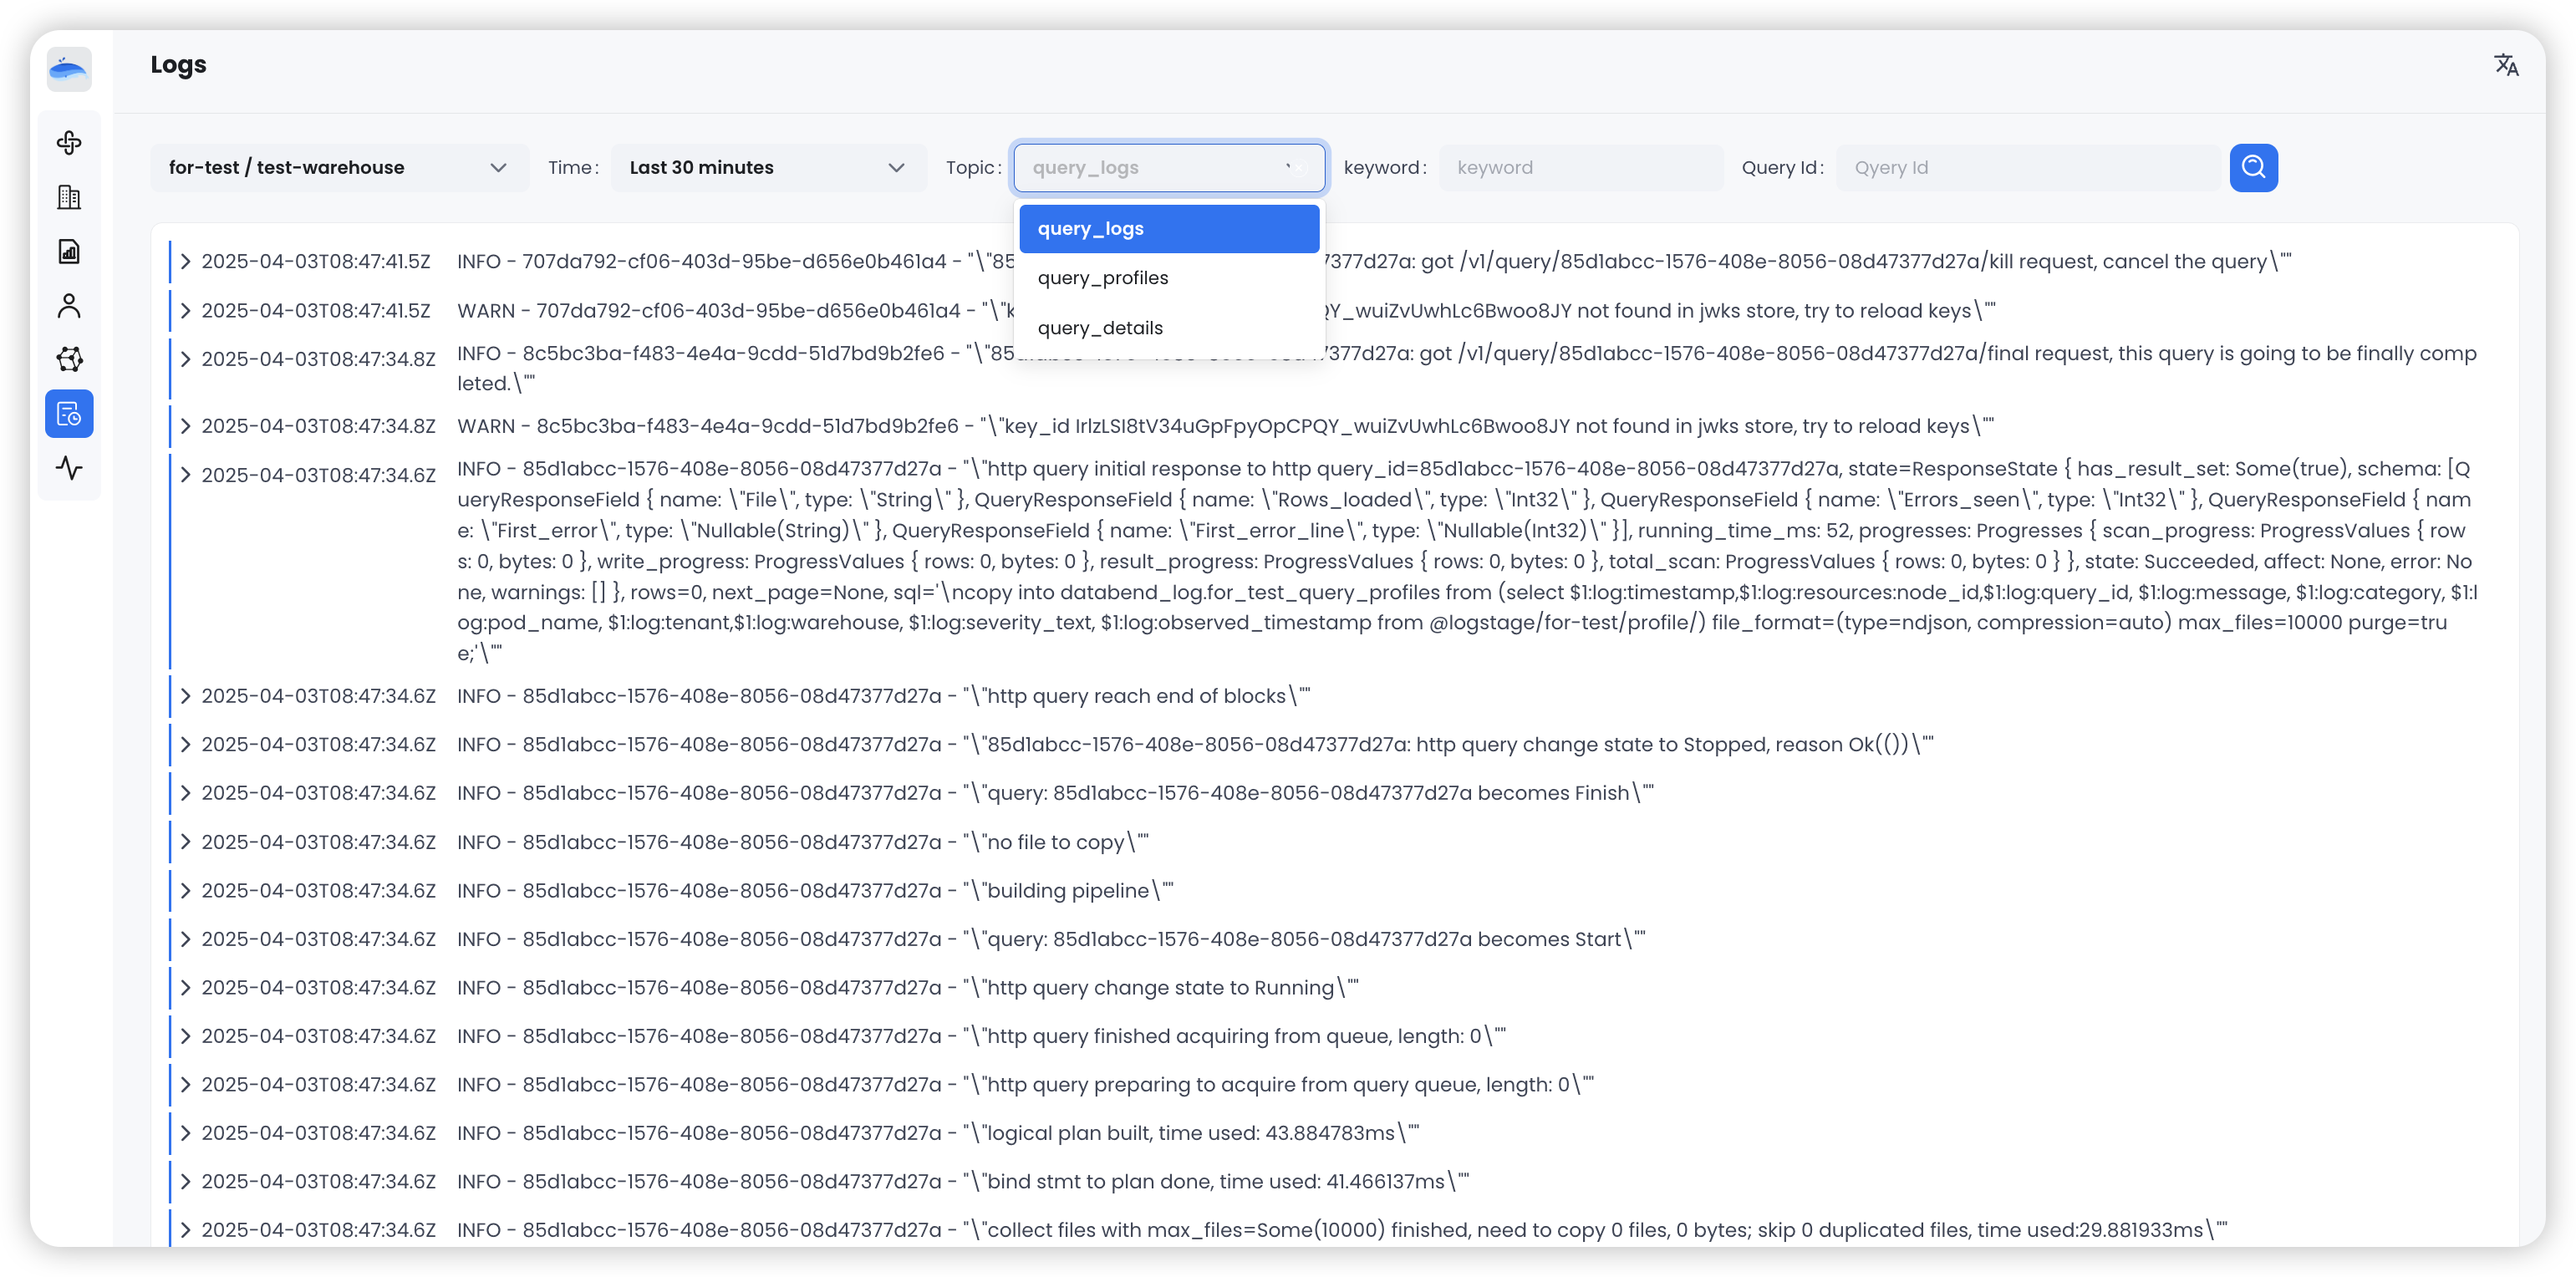
Currently, there are three types of logs stored:
query_logs
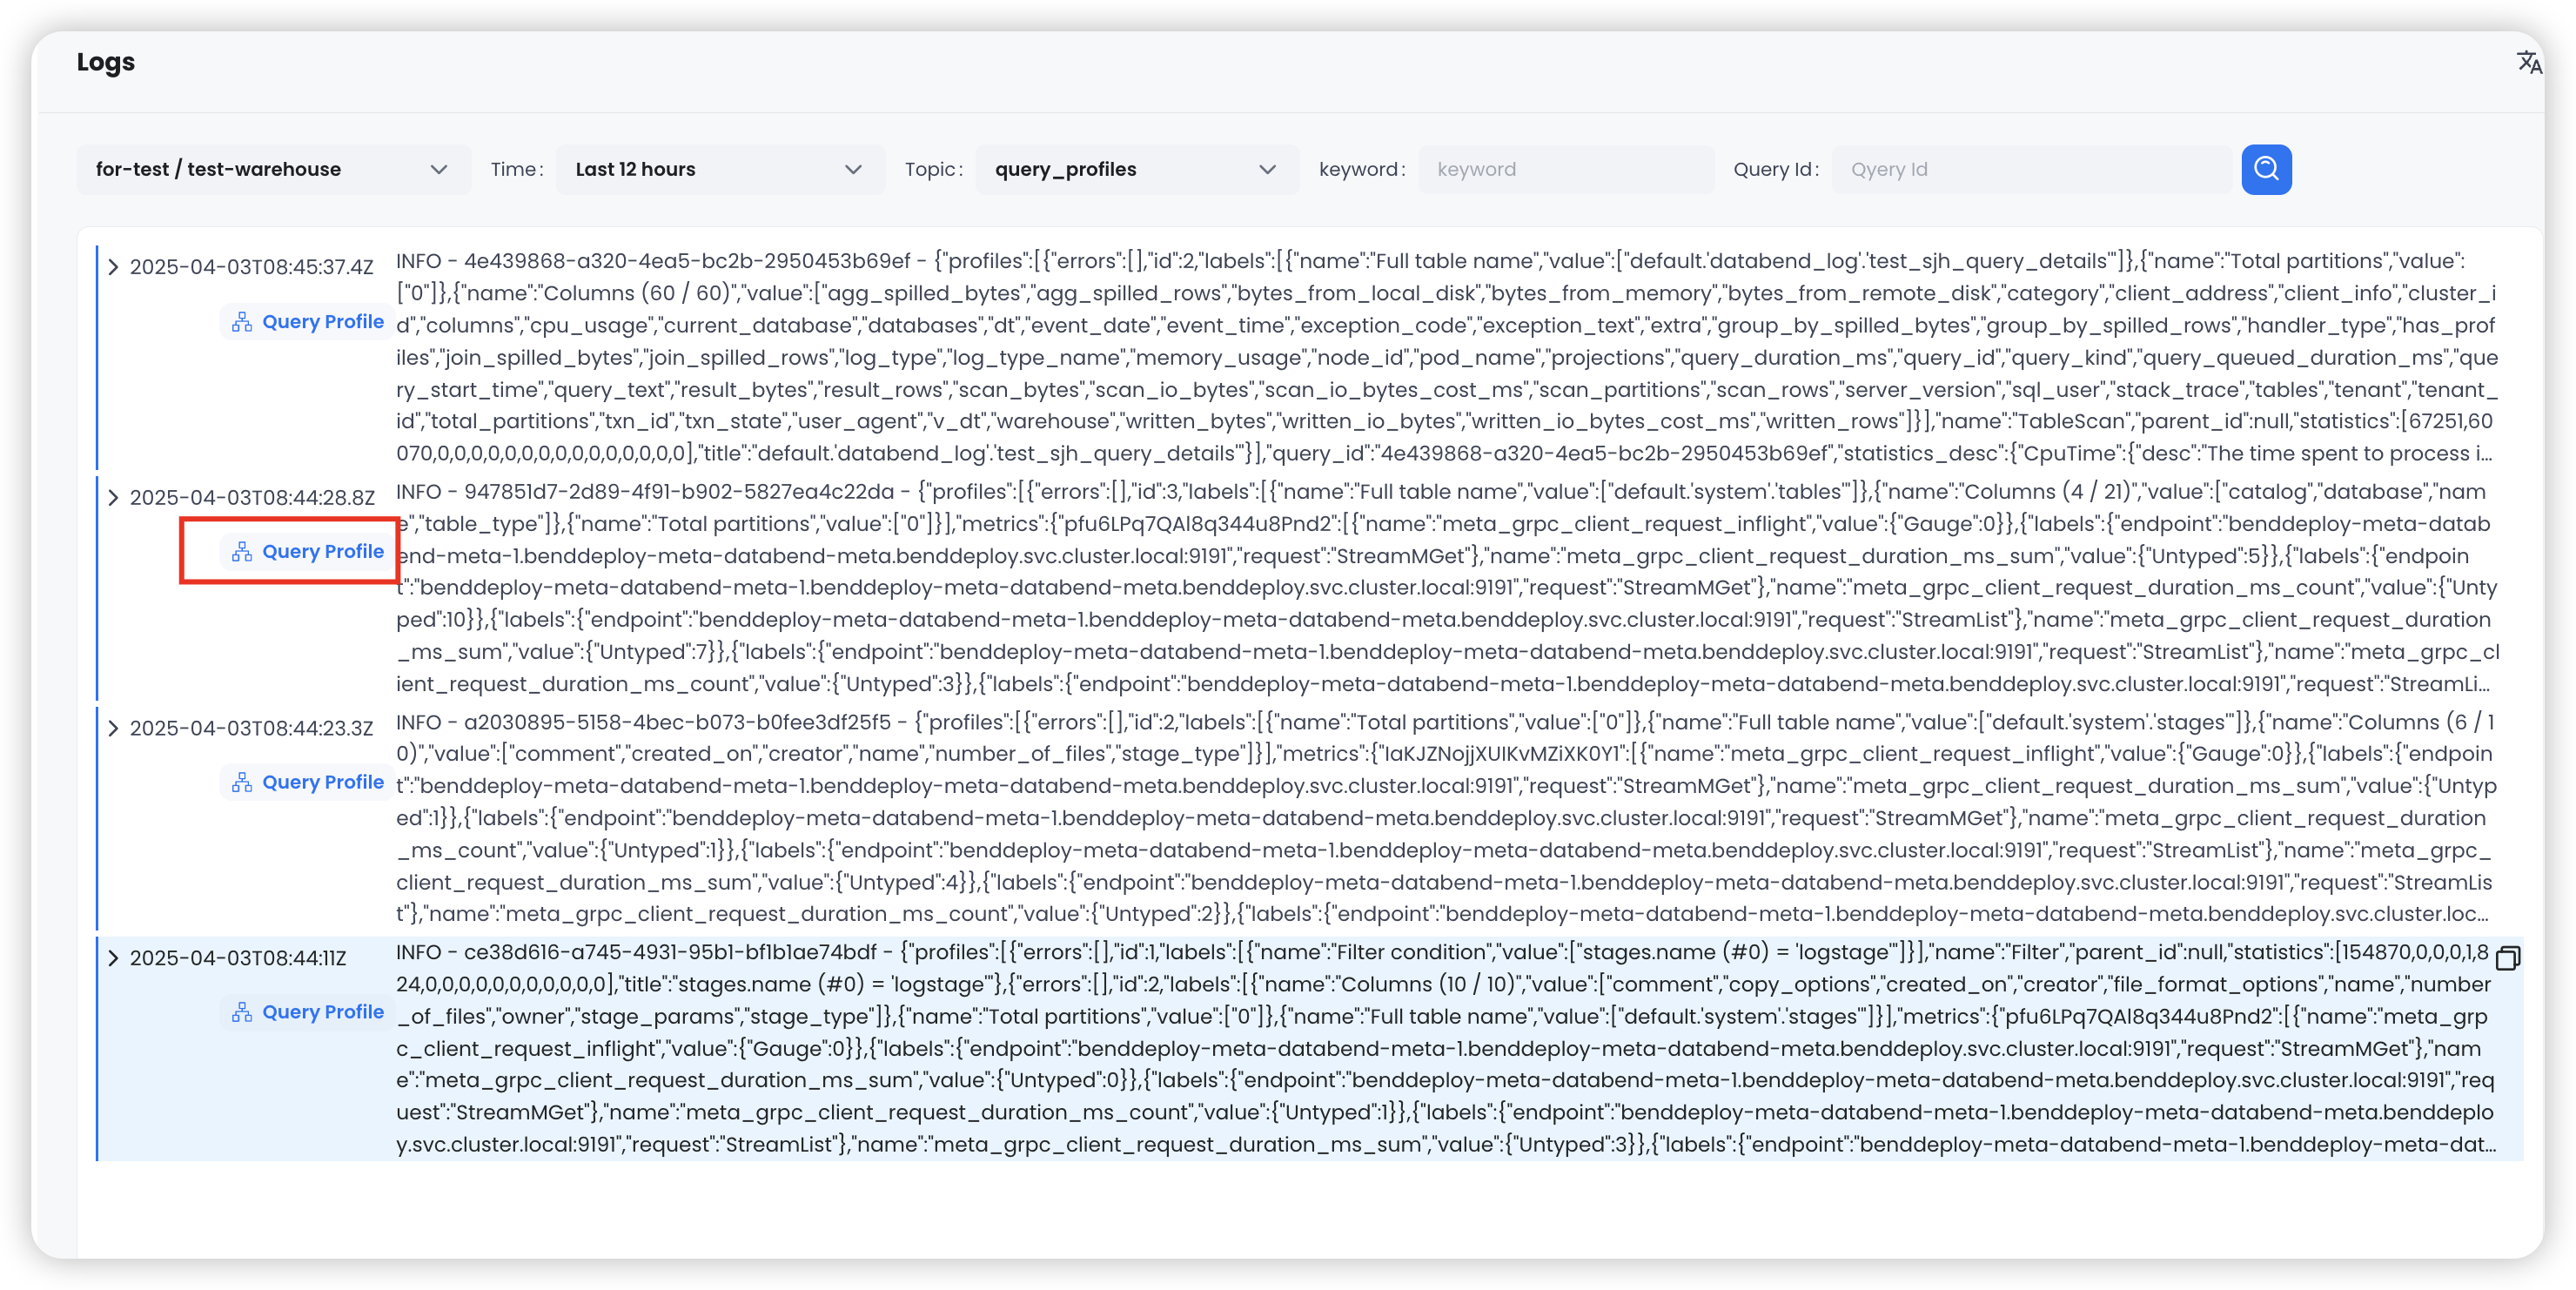
query_profiles
query_details
query_profiles
EXPLAIN
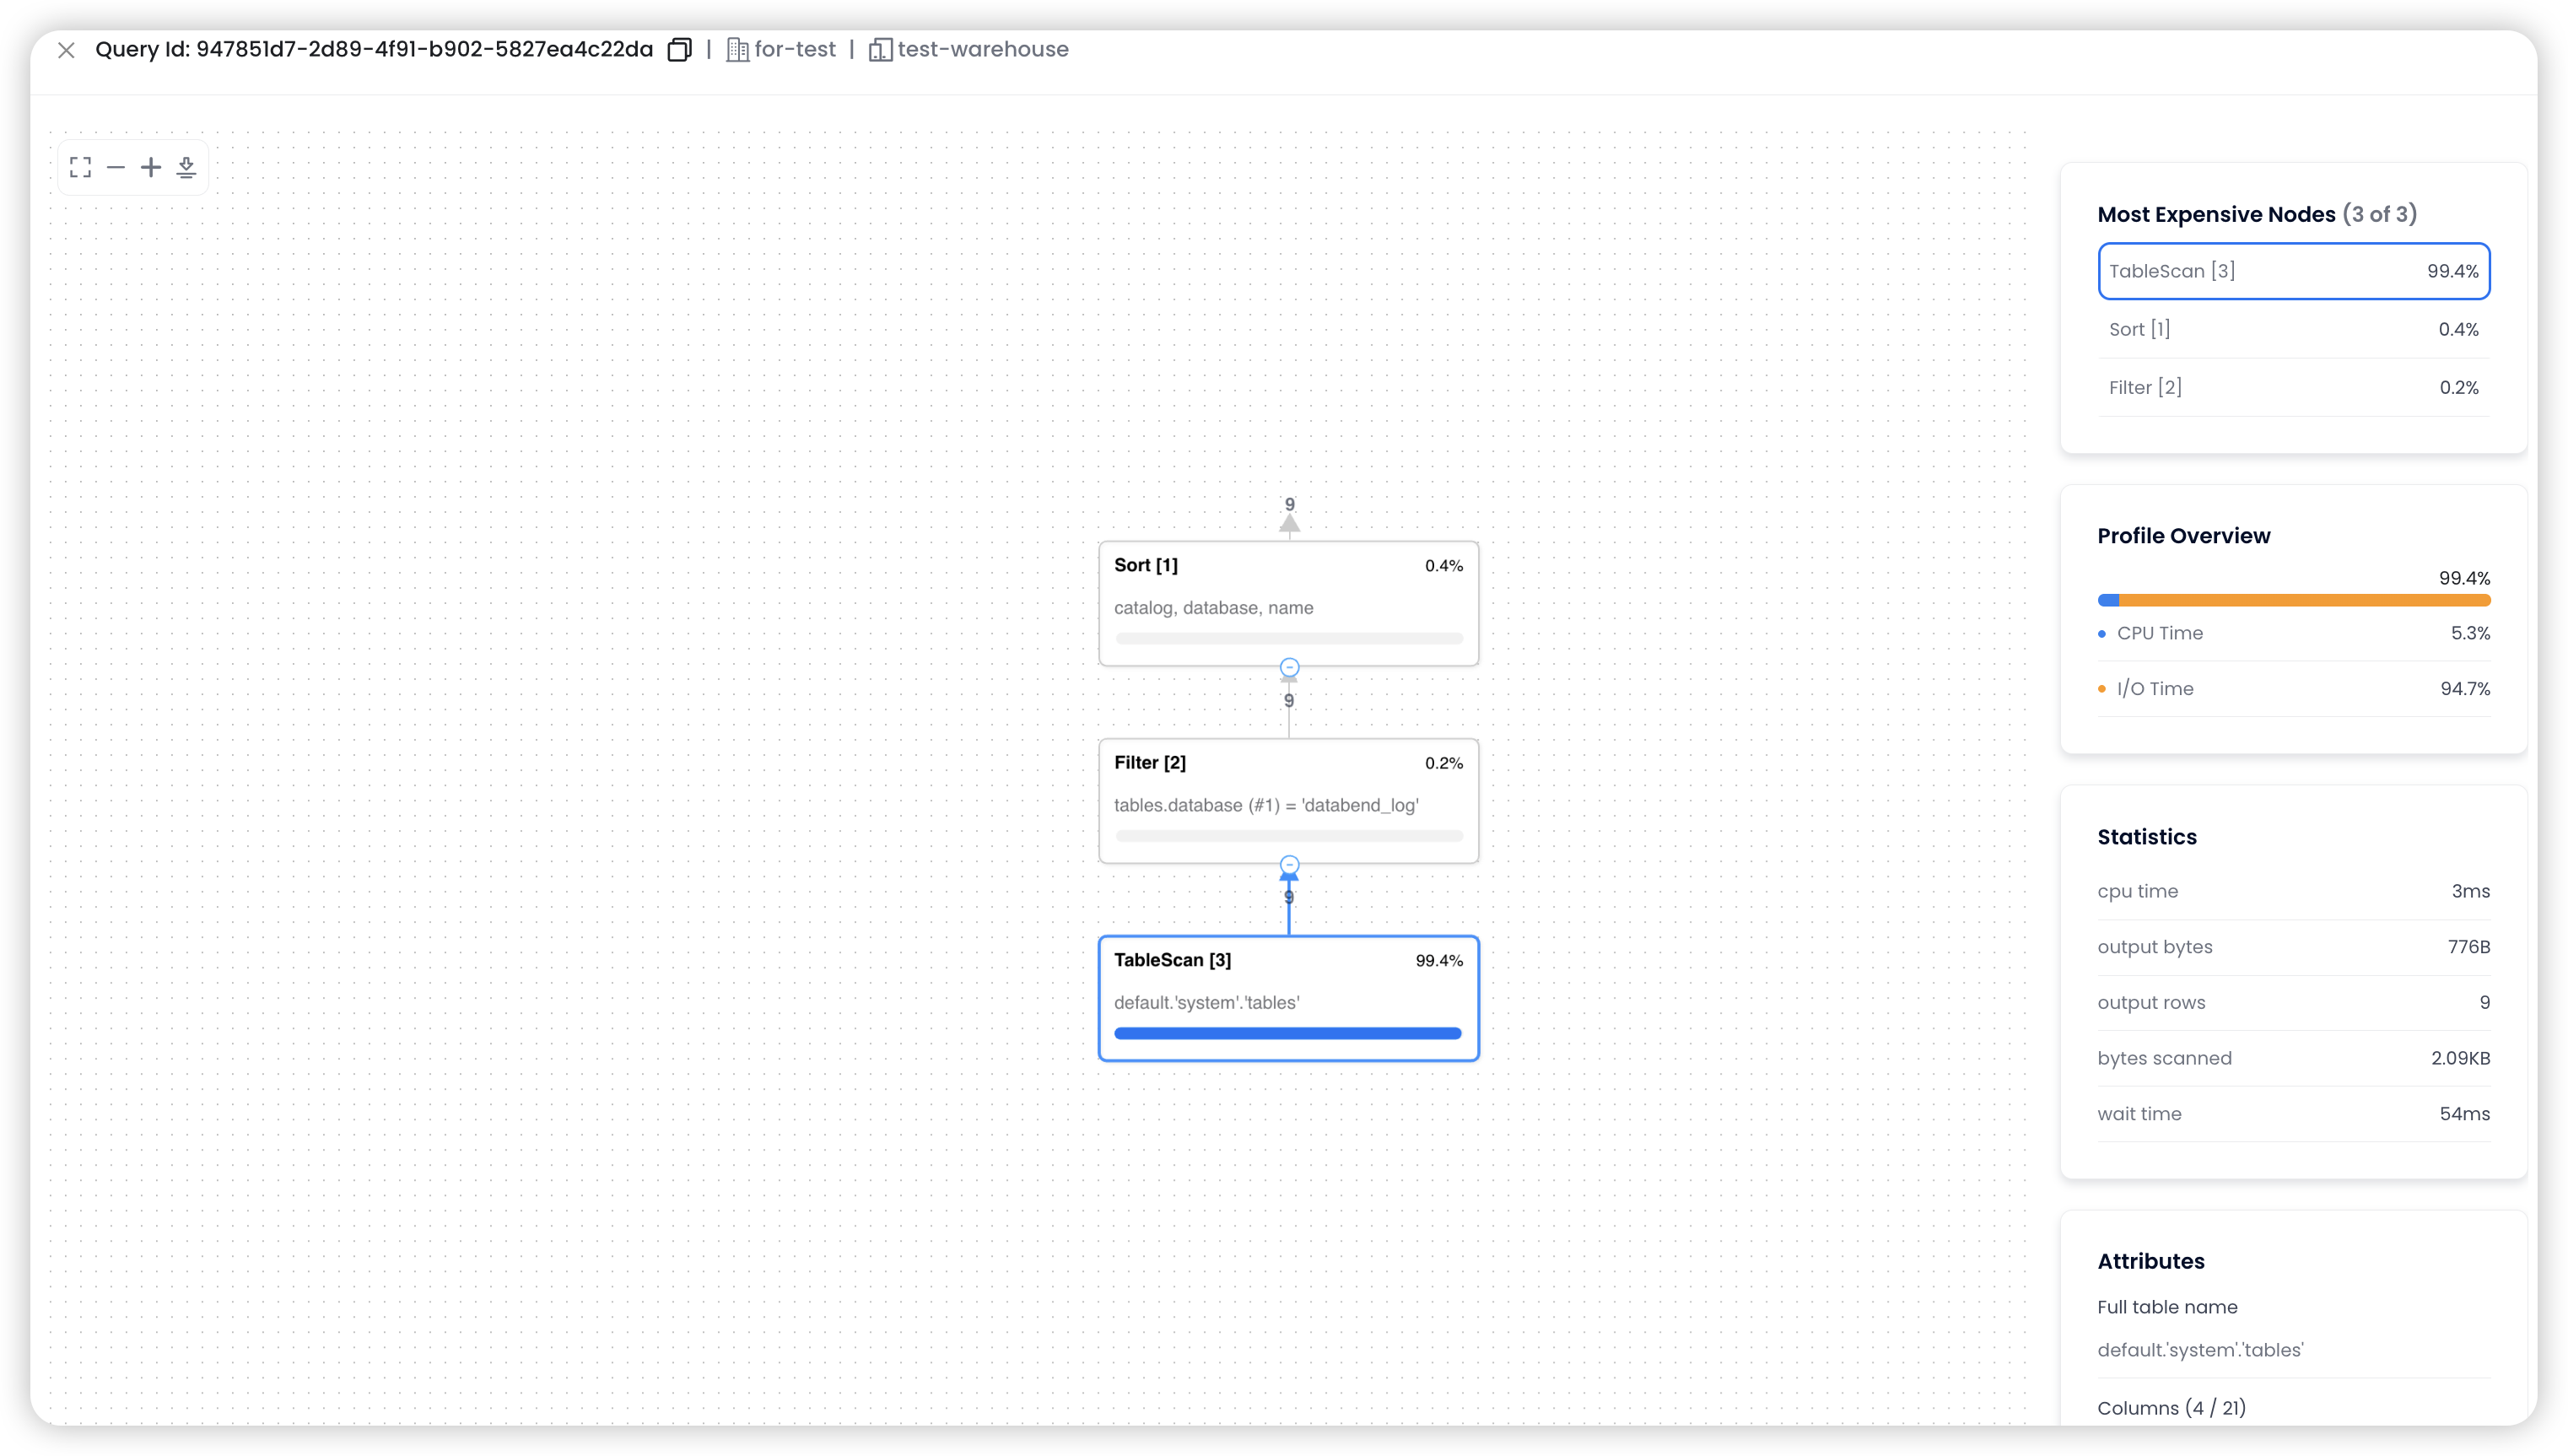
You can also query logs based on the
query_id
Manage Users
The user module is used to manage the creation, deletion, and password modification of users. When creating a user, you can add them to a specific tenant and select the role (role) for running SQL queries. Only administrators have the permission to manage users. For more details, refer to the video tutorial below.
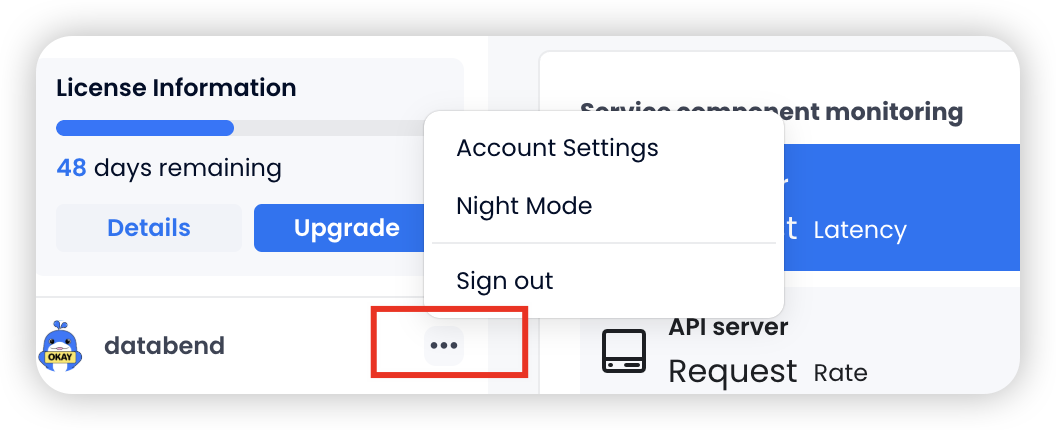
Switch User
Users can click the three dots in the lower-left corner to view user details and log out, allowing them to switch users and log in again.
SQL IDE
BendDeploy provides a convenient SQL IDE access entry in the left navigation bar. In the IDE, users can view data in the database, select databases, and perform SQL queries, data viewing, permission management, and other operations.
Upgrade BendDeploy
To upgrade BendDeploy, simply find the latest Docker image on AWS ECR, and then use
helm upgrade
Future Evolution Plan
As data infrastructure evolves toward cloud-native technologies, there is a growing demand for private deployments from users with high data privacy requirements. To meet these needs, we will continue to optimize the user experience of BendDeploy. The upcoming evolution roadmap includes the following:
- Integration of Databend Cloud's Task Features: We will integrate Databend Cloud's Task feature, supporting scheduled tasks and DAG-based task flow orchestration, enabling automated data processing workflows.
- Control Panel Upgrade with Databend Operator: We will upgrade the control panel by introducing the Databend Operator, a fully Kubernetes-native, scalable operations tool. This will allow users to abstract tenant configurations and compute resources into declarative objects using Custom Resource Definitions (CRD), providing the same level of automation, elasticity, and observability in any Kubernetes cluster as in cloud services.
- Based on the databend-operator, support Multi-Cluster to enhance the stability and reliability of the query service.
These improvements will make BendDeploy the preferred solution for deploying Databend in enterprise private environments, matching cloud services in both functionality and operational convenience.
Summary
Databend offers a standardized Kubernetes-based private deployment and management platform — BendDeploy, enabling users to quickly and securely deploy and manage multiple Databend clusters and tenants. BendDeploy provides a user-friendly visual interface for operations and maintenance, significantly improving efficiency while reducing errors and downtime. With BendDeploy, users can perform multi-tenant management, cluster deployment, scaling, upgrading, and node management.
In addition, BendDeploy includes capabilities for log collection, querying, and analysis — centralizing logs in one platform and simplifying operations. Users can also manage users, run SQL queries, and view data directly through BendDeploy. Thanks to its fully cloud-native architecture, deploying BendDeploy is fast and convenient.
In short, BendDeploy provides Databend users with a comprehensive and easy-to-use management platform. Give it a try!
Subscribe to our newsletter
Stay informed on feature releases, product roadmap, support, and cloud offerings!